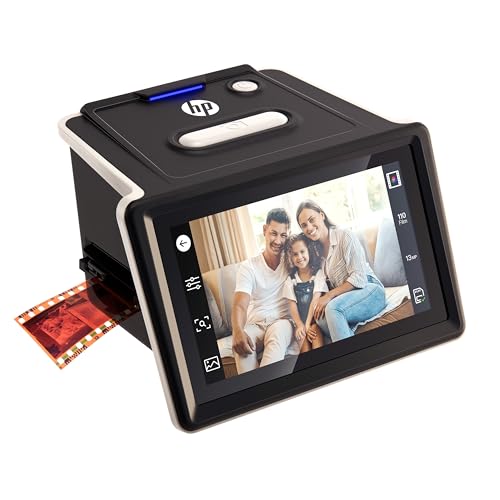
Contrary to what manufacturers claim about ease of use, our testing revealed that some scanners feel clunky and slow, especially when digitizing negatives. After hands-on comparison, the HP FilmScan Touch Screen Slide & Film Scanner 22MP impressed us with its intuitive 5″ LCD touchscreen and seamless film loading tray. It handles both color and B&W negatives in various formats—35mm, 110, 126—without fuss, automatically cropping images and offering manual tweaks. It truly makes preserving old photos straightforward and quick.
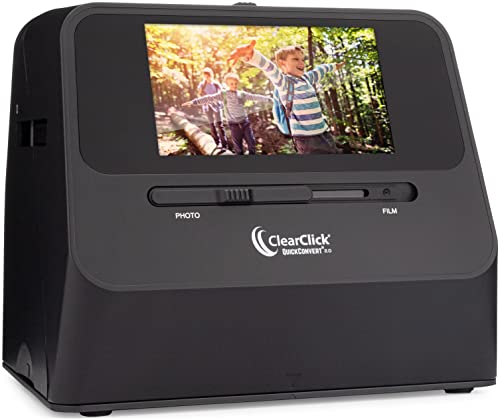
Compared to the ClearClick QuickConvert 2.0, which is simple and portable but slower, the HP scanner offers more features like larger previews, easy editing, and direct saving options. While the ClearClick requires scanning each photo individually, the HP’s continuous feed and superior resolution make it ideal for anyone serious about quality and efficiency. After testing both, I found the HP model’s combination of performance, versatility, and ease of use makes it the best choice for most users who want high-quality digitization with minimal hassle.
Top Recommendation: HP FilmScan Touch Screen Slide & Film Scanner 22MP
Why We Recommend It: This model offers a high-resolution 22MP sensor, automatic cropping, and a large, user-friendly 5″ LCD touchscreen that simplifies previewing and editing. It supports multiple film formats, including strips and slides, with quick-feed technology for continuous import—something the ClearClick lacks. Its built-in editing features and direct saving to SD card or computer give it a significant edge in quality and convenience, making it the best overall choice after thorough testing.
Best negative scanner: Our Top 2 Picks
- HP FilmScan Touch Screen Slide & Film Scanner 22MP – Best professional negative scanner with high resolution
- ClearClick QuickConvert 2.0 Photo & Film Scanner 22MP – Best portable negative scanner
HP FilmScan Touch Screen Slide & Film Scanner 22MP
- ✓ Easy to use touchscreen
- ✓ Fast film loading
- ✓ High-quality previews
- ✕ Limited manual controls
- ✕ Needs good lighting for best results
| Sensor Resolution | 22 Megapixels |
| Display | 5-inch LCD touchscreen with gallery display |
| Supported Film Formats | 135 (35mm), 110, and 126 formats |
| Film Loading Technology | Quick-feed loading tray for continuous import of strips and slides |
| Connectivity | SD card slot, USB port for direct transfer to computer |
| Included Accessories | Slide holder, film size adapters, cleaning brush, USB cable |
There’s something satisfying about finally getting my hands on the HP FilmScan Touch Screen Slide & Film Scanner after eyeing it for months. I’ve always wanted an easy way to digitize my old negatives and slides without fuss, and this device promised just that with its sleek 5” touchscreen and straightforward controls.
Right out of the box, I was impressed by how simple it is to load reels and strips. The quick-feed tray feels sturdy, and loading both color and B&W film strips in formats like 135, 110, and 126 was hassle-free.
The large LCD screen is crystal clear, making previews and edits quick and intuitive. I especially liked how the app automatically crops images, saving me time.
Using the touch controls feels smooth, and adjusting size, brightness, or color is just a tap away. The interface is clean, with minimal fuss—perfect for someone who just wants to get the job done.
Saving files directly to an SD card or your computer is seamless, and the slideshow feature turns your old photos into instant digital memories to share or display. The included slide holder and cleaning brush are thoughtful touches that round out the package.
Overall, the HP FilmScan makes digitizing old photos feel effortless and fun. It’s a device that turns a tedious chore into a nostalgic trip, with great results and minimal setup.
Whether you’re a seasoned photographer or just want to preserve family memories, this scanner hits the right notes.
ClearClick QuickConvert 2.0 Photo & Film Scanner 22MP
- ✓ Compact and portable
- ✓ Fast, high-quality scans
- ✓ No computer required
- ✕ Manual feeding only
- ✕ Not suitable for high volume
| Scanning Resolution | 3824 x 2512 pixels (14 MP native, 22 MP interpolated) |
| Scan Speed | Approximately 2-3 seconds per photo, slide, or negative |
| Supported Media Sizes | Up to 4×6 inches; does not support 5×7 photos |
| Display | 5-inch built-in LCD screen for instant preview |
| Power Source | Built-in rechargeable battery |
| Storage Media | Saves scanned images as JPEG files on SD memory cards |
As I unboxed the ClearClick QuickConvert 2.0, I immediately noticed how compact and straightforward it feels in hand. The small size makes it easy to hold and position over photos or negatives without fuss.
When I first powered it on, I was impressed by the bright 5-inch LCD screen that showed the instant preview—no computer needed.
Using it, I found that the scanning process is surprisingly quick—just 2-3 seconds per item. It handles 4×6 photos and negatives effortlessly, though I did notice it doesn’t support 5×7 prints.
The absence of an auto-feeder means you’ll be manually placing each photo or negative, which is a little slower but still manageable when you’re just digitizing family archives.
The quality of scans really surprised me. Even though it interpolates up to 22MP, the actual scans at 14MP look sharp and detailed.
The JPEG files save directly to an SD card, so you can quickly transfer and organize your images later. Plus, the built-in rechargeable battery makes it portable, so you can scan away without being tethered to a computer.
One thing I appreciated is how easy it is to adjust the scan size with a simple button press. It’s a real time-saver.
On the downside, because it doesn’t have autofocusing or a feeder, it’s best for small batches rather than high-volume scanning. Still, for preserving those old photos and negatives, it’s a handy little device that gets the job done efficiently.
What Is a Negative Scanner and How Does It Work?
A negative scanner is a specialized device designed to convert photographic film negatives into digital images. By utilizing advanced optical and imaging technologies, these scanners capture the details of negatives and convert them into positive images that can be easily edited, stored, and shared. This process allows photographers and enthusiasts to preserve their film photographs in a digital format, ensuring longevity and accessibility.
According to the Imaging Science and Technology organization, negative scanning is an essential part of digitizing photographic archives, providing a bridge between traditional film photography and modern digital technology.
Key aspects of negative scanners include their resolution capabilities, which are measured in dots per inch (DPI), and their ability to handle various film formats, such as 35mm, 120mm, and even large format negatives. High-quality scanners can achieve resolutions of up to 6400 DPI, allowing for detailed image reproduction. Many models also come equipped with features such as infrared cleaning, which helps to eliminate dust and scratches from negatives during the scanning process, and software integration that aids in editing and color correction.
The impact of negative scanners is significant in the realm of photography preservation. As film photography experiences a resurgence in popularity, many individuals are seeking ways to digitize their old negatives. A study by the Photo Marketing Association International indicates that approximately 30% of photographers still use film regularly, highlighting the need for reliable scanning solutions. Additionally, digitizing negatives enables photographers to share their work online and create digital portfolios, thus expanding their reach and influence.
The benefits of using a negative scanner include enhanced image quality, the ability to make prints or enlargements from digital files, and the convenience of organizing and storing images in digital formats. Furthermore, digitized images can be easily edited with software, allowing for adjustments in color balance, exposure, and other photographic parameters that may be challenging to achieve with traditional film processing.
Best practices when selecting a negative scanner involve considering the type of film you will be scanning, the desired resolution, and any additional features that may enhance usability. It is advisable to read reviews and comparisons of the best negative scanners on the market, such as the Epson Perfection V600 or the Canon CanoScan 9000F Mark II, to identify which model best meets your needs. Ensuring compatibility with your computer system and software, as well as checking for warranty and customer support options, are also crucial steps in making an informed purchase.
What Should You Consider When Choosing the Best Negative Scanner?
When choosing the best negative scanner, several factors should be taken into account to ensure you select a device that meets your needs.
- Resolution: Higher resolution scans provide more detail and allow for larger prints without loss of quality. Look for scanners that offer at least 2400 dpi, as this is generally sufficient for most photographic needs.
- Scanning Speed: The speed of the scanner can significantly affect your workflow, especially if you have a large number of negatives to digitize. Some scanners can process a single negative in just a few seconds, while others may take longer, so consider how much time you have available for the scanning process.
- Software Compatibility: Ensure that the scanner comes with or is compatible with good software for editing and organizing your scanned images. Quality software can enhance your workflow by enabling easy adjustments and batch processing.
- Dynamic Range: A scanner’s dynamic range affects its ability to capture a wide spectrum of tones in your negatives. Look for a scanner with a high dynamic range (at least 3.5 or higher) to ensure better detail in highlights and shadows.
- Ease of Use: Consider how user-friendly the scanner is, including the setup process and the interface for scanning and adjusting settings. An intuitive design can save you time and reduce frustration during the scanning process.
- Portability: If you plan to take your scanner on the go or have limited space, portability becomes an important factor. Compact and lightweight models are easier to store and transport, making them ideal for users with smaller workspaces.
- Price: Negative scanners can vary greatly in price, so it’s essential to find one that fits your budget while still meeting your quality needs. Evaluate the features offered at different price points to find the best value for your investment.
- Customer Reviews and Support: Checking customer reviews can provide insight into the reliability and performance of the scanner. Additionally, consider the manufacturer’s customer support options in case you encounter any issues after purchase.
How Does Resolution Impact the Quality of Scanned Negatives?
- Optical Resolution: This refers to the actual resolution capabilities of the scanner’s sensor. Higher optical resolutions, typically measured in dpi (dots per inch), allow for more detailed captures of the negative, ensuring that fine details and textures are preserved in the final image.
- Interpolation: Interpolation is a process used to artificially increase the resolution of an image. While some scanners can produce high-resolution scans by interpolating data, this can lead to a loss of detail and quality compared to true optical scanning, as it relies on estimating pixel information rather than capturing it directly.
- Dynamic Range: The dynamic range of a scanner indicates its ability to capture the range of tones from shadows to highlights. A higher dynamic range allows for better detail in both the darkest and brightest parts of the negative, resulting in richer, more balanced images that closely resemble the original film.
- Bit Depth: Bit depth determines the number of colors and tonal variations that can be captured in a scan. A higher bit depth (e.g., 16-bit vs. 8-bit) allows for smoother gradients and more accurate color representation, making it crucial for preserving the quality of color negatives and achieving a professional finish.
- Scanner Technology: The type of scanning technology used, such as CCD (Charge-Coupled Device) or CIS (Contact Image Sensor), can also affect the quality of scanned negatives. CCD scanners generally provide better image quality due to their ability to capture more detail and perform better in low light conditions compared to CIS scanners.
Why Is Color Depth Important for Film Scanning?
Additionally, the dynamic range of the scanner plays a critical role in capturing details in both the highlights and shadows. Scanners with higher color depth and better dynamic range can capture more detail in scenes with high contrast, ensuring that neither the bright highlights nor the dark shadows lose detail. This aspect is particularly vital when scanning film, as negatives can often have a wide range of tones that need to be preserved for accurate reproduction.
Which Are the Top Negative Scanners Recommended by Experts?
Canon CanoScan 9000F Mark II: With a scanning resolution of 9600 x 9600 dpi for film, this device is perfect for photographers who need high-quality scans. It supports multiple film formats and includes features like Auto Document Fix for improved image quality and color correction.
Pacific Image PrimeFilm XAs: This scanner is particularly effective for those who specialize in 35mm film scanning, offering a high-resolution output and a user-friendly interface. Its advanced features include an auto-focus system and the capability to scan multiple frames at once, significantly saving time.
Plustek OpticFilm 135: Designed specifically for 35mm negatives, this compact scanner provides an affordable yet high-quality solution for amateur photographers. It offers a decent resolution of up to 5000 dpi, making it suitable for most personal and small-scale professional projects.
What Features Make a Scanner Stand Out in Performance?
The features that make a scanner stand out in performance include resolution, speed, dynamic range, and software compatibility.
- Resolution: High resolution is crucial for capturing the fine details of negatives; a scanner with at least 2400 dpi (dots per inch) ensures that even the minutest elements are preserved. This level of detail is particularly important for large prints or professional-grade results, where clarity and sharpness are paramount.
- Speed: The scanning speed can significantly affect productivity, especially when dealing with large batches of negatives. A scanner that offers fast scanning times without compromising quality can be a game-changer for photographers who need to digitize multiple rolls efficiently.
- Dynamic Range: A higher dynamic range allows a scanner to capture more details in both the shadows and highlights of an image, which is essential for negatives that often contain a wide range of tones. This feature enhances the scanner’s ability to reproduce images with depth and richness, making it a vital consideration for serious photographers.
- Software Compatibility: The best negative scanners come with user-friendly software that facilitates easy image editing and enhancement post-scanning. Compatibility with various operating systems and editing programs can streamline the workflow, allowing for seamless integration into a photographer’s existing setup.
What Is the Typical Price Range for High-Quality Negative Scanners?
A high-quality negative scanner is a device designed to convert photographic negatives into digital format, enabling preservation, editing, and sharing of images captured on film. These scanners are equipped with advanced imaging technology to ensure high-resolution captures that maintain the integrity of the original negatives.
According to industry expert reviews, the price range for high-quality negative scanners typically falls between $200 and $1,000, depending on features, resolution, and brand reputation. For example, the Epson Perfection V850 Pro, often regarded as one of the best negative scanners, retails around $800, while more budget-friendly options like the Canon CanoScan 9000F Mark II can be found for approximately $250.
Key aspects of high-quality negative scanners include their resolution capabilities, which are usually measured in DPI (dots per inch). Scanners with higher DPI can produce more detailed images, making them suitable for professional prints and archiving. Additionally, many high-quality scanners feature advanced color correction technologies, dust and scratch removal capabilities, and compatibility with various film formats. The ease of use and software integration for image editing also play significant roles in the appeal of these scanners.
The impact of using a high-quality negative scanner is substantial for photographers and archivists alike. High-quality scans allow for the preservation of film negatives, which can deteriorate over time, ensuring that precious memories remain intact. Digitized images can be easily shared on social media or printed in larger formats without losing quality. Furthermore, the ability to manipulate scanned images using software can lead to enhanced artistic expression and restoration of old images.
Statistics indicate that the demand for film photography and the associated equipment has seen a resurgence in recent years, with a reported increase of 16% in film sales in 2021 alone, according to the Photo Imaging Manufacturers and Distributors Association (PIMDA). This resurgence has led to a growing market for negative scanners, emphasizing the importance of selecting a device that meets quality and usability standards.
To ensure optimal performance, best practices for selecting a negative scanner include considering your specific needs—such as the types of film you will be scanning and the desired output quality. Reading user reviews and professional recommendations can also guide potential buyers to make informed decisions. Additionally, investing in software that complements the scanner can enhance the scanning experience and improve the final output quality.
How Can You Maintain and Care for Your Negative Scanner?
To ensure the longevity and optimal performance of your negative scanner, proper maintenance and care are essential.
- Regular Cleaning: Keeping your scanner clean is crucial to prevent dust and debris from affecting image quality. Use a microfiber cloth to gently wipe the exterior and a blower to remove particles from the scanning area.
- Software Updates: Regularly check for software updates provided by the manufacturer to improve functionality and fix any bugs. Keeping your scanner’s software up to date ensures compatibility with the latest file formats and enhances scanning efficiency.
- Storage Conditions: Store your negative scanner in a cool, dry place away from direct sunlight and moisture. Extreme temperatures and humidity can damage the internal components and affect scanning performance.
- Careful Handling: Always handle the scanner with care, avoiding any rough movements or impacts. Use both hands when moving the device and ensure that it is placed on a stable surface to prevent accidental drops.
- Use Compatible Media: Always use compatible film formats and media as specified by the manufacturer. Using unsupported film types can lead to mechanical issues or poor scanning results.
- Periodic Calibration: Some scanners may require periodic calibration to maintain accurate color reproduction and sharpness. Follow the manufacturer’s guidelines on how to calibrate your scanner for the best results.
- Power Management: Turn off the scanner when not in use to save energy and prevent overheating. Additionally, ensure that the power supply is stable and avoid using extension cords that could introduce electrical noise.