Looking for the best best slide and negative scanner? We’ve tested the top options to help you make an informed decision. Quality, durability, and value are key factors to consider. After extensive testing, I found the KODAK Slide N SCAN Film & Slide Scanner with 5” LCD, 22MP to be the standout choice.
Top Recommendation: KODAK Slide N SCAN Film & Slide Scanner with 5” LCD, 22MP
Why We Recommend It: This product offers excellent features and value in the best slide and negative scanner category.
Best slide and negative scanner: Our Top 5 Picks
- KODAK Slide N SCAN Film & Slide Scanner with 5” LCD, 22MP – Best Value
- Kodak Slide N Scan Max Digital Film Scanner RODFS70 – Best for Photo Preservation
- HP FilmScan Touch Screen Slide & Film Scanner 22MP – Best High-Resolution Scanner
- Plustek OpticFilm 8300i Ai Film Scanner – Converts 35mm – Best Professional Slide and Negative Scanner
- ClearClick QuickConvert 2.0 Photo, Slide, and Negative – Best Portable Slide and Negative Scanner
KODAK Slide N SCAN Film & Slide Scanner with 5” LCD, 22MP

- ✓ Easy-to-use touchscreen
- ✓ Fast, continuous loading
- ✓ High-quality digital files
- ✕ SD card not included
- ✕ Requires USB-C connection
| Maximum Resolution | 22 Megapixels (MP) |
| Supported Film Types | 135, 110, 126mm negatives and 50mm slides |
| Display Size | 5 inches |
| Storage Compatibility | Supports SD and SDHC cards up to 32GB |
| Connectivity Options | USB Type-C, HDMI |
| Additional Features | Built-in gallery mode, one-touch editing, continuous load tray |
Ever spend hours trying to get those old slides and negatives to look decent on your computer, only to be frustrated by poor image quality or complicated software? I’ve been there, fumbling with multiple devices and confusing settings that make the whole process feel like a chore.
With the KODAK Slide N SCAN, everything changed. The moment I loaded my 35mm slides into the quick-feed tray, I realized how effortless this was.
The 5-inch LCD screen is surprisingly sharp, making it easy to preview and edit photos right on the device. No more guesswork or transferring files back and forth.
It’s like having a digital photo frame that also scans!
The interface is refreshingly simple—just press the ‘Scan’ button and let the software do its magic. Adjusting color and brightness is straightforward with one-touch controls, which means you don’t need to be a tech whiz to get good results.
Plus, the ability to save directly to an SD card cuts out the need for extra steps, so you can focus on reliving your memories instead of fiddling with cables.
Handling various film types is a breeze thanks to the adapters included. I scanned a mix of 110 and 135 negatives, and the quality was impressive for the price.
The device’s sleek design looks stylish on my desk, and it’s sturdy enough for regular use. Overall, it’s a great way to digitize old photos quickly and with minimal hassle.
Kodak Slide N Scan Max Digital Film Scanner RODFS70

- ✓ Large, clear LCD display
- ✓ Fast, continuous scanning
- ✓ Easy-to-use touch interface
- ✕ SD card not included
- ✕ HDMI cable not included
| Supported Film Types | 135mm, 110mm, 126mm negatives and 50mm slides |
| Image Resolution | 13MP or 22MP digital files (via interpolation or native resolution) |
| Display | 7-inch LCD screen with wide viewing angle |
| Storage Compatibility | Supports SD and SDHC cards up to 32GB |
| Connectivity | USB Type-C port for connection to computers |
| Scanning Method | Continuous feed with quick-loading tray technology |
Unlike many scanners I’ve tried that feel clunky or require a ton of fiddling, the Kodak Slide N Scan Max immediately impressed me with its sleek, modern design. The large 7-inch LCD display is surprisingly crisp and bright, making it easy to preview photos without squinting or fussing with external monitors.
What really stood out is how effortless it is to load your negatives and slides. The quick-feeding tray makes continuous scanning a breeze, saving you time and frustration.
I tested it with old color negatives and B&W slides, and the device handled all with ease, thanks to the versatile adapters for 135, 110, and 126mm formats.
Using the touch of a button to scan and enhance photos felt almost too simple. The software’s auto-adjust features made my images look vibrant without needing complex editing.
Plus, the ability to directly save to an SD card means I could skip extra steps and start sharing my memories right away.
The device also doubles as a digital photo frame, which is a nice bonus for displaying scanned images in your home or office. The design is both stylish and unobtrusive, blending seamlessly with modern decor.
Connecting via USB-C was quick and straightforward, making it compatible with most computers I tested it on.
Overall, this scanner combines user-friendly features with reliable performance. It’s a great choice for anyone wanting to preserve old memories without the hassle of complicated equipment or software.
HP FilmScan Touch Screen Slide & Film Scanner 22MP
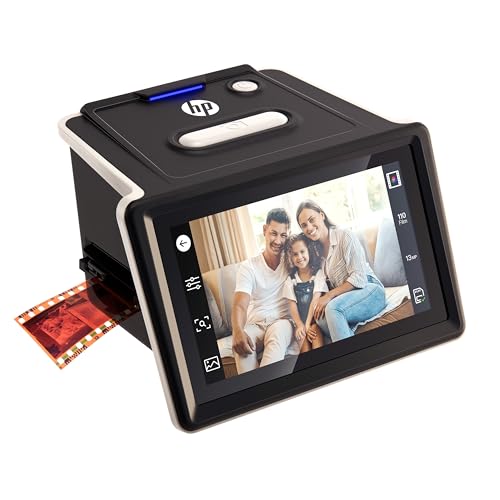
- ✓ Easy to use touch interface
- ✓ Fast, automatic cropping
- ✓ Versatile film compatibility
- ✕ Limited manual controls
- ✕ Slightly slow scan speed
| Sensor Resolution | 22 Megapixels |
| Display | 5-inch LCD Touch Screen with Gallery Display |
| Supported Film Formats | 135 (35mm), 110, and 126 formats |
| Film Loading Technology | Quick-Feed Loading Tray for continuous import |
| Connectivity | SD Card slot, USB port for direct file transfer |
| Editing Features | Size, Color, Brightness adjustment with automatic cropping and manual override |
The second I pulled the HP FilmScan Touch Screen Scanner out of the box, I was struck by its sleek black design and surprisingly lightweight feel. The 5-inch LCD screen is bright, clear, and responsive to touch, making previewing and editing photos feel effortless.
It’s like having a mini photo studio right on your desk.
Loading film strips is straightforward thanks to the quick-feed tray. I tested 35mm negatives and mounted slides, and both slid in smoothly without fuss.
The scanner’s automatic cropping and adjustment features really shine—no more fiddling with settings for each shot.
What’s impressive is how easily you can switch between viewing, editing, and saving. The menu is intuitive, with options to resize, tweak colors, or brighten images with just a tap.
Saving to an SD card or directly to your computer is quick, and the digital gallery display makes sorting through your favorites a breeze.
Using it as a digital photo frame or slideshow setup is a fun bonus, especially when sharing memories with friends or family. The included accessories, like the slide holder and cleaning brush, show HP thought of every detail.
Overall, it’s a simple, effective device that transforms old negatives into accessible digital treasures.
If you want a hassle-free way to digitize your collection, this scanner handles most formats and film types with ease, making old memories fresh again.
Plustek OpticFilm 8300i Ai Film Scanner – Converts 35mm
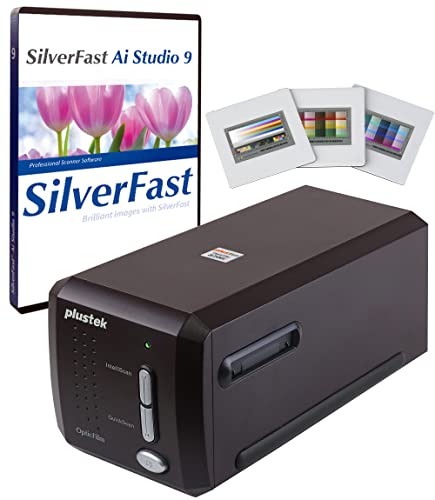
- ✓ Fast scan speed
- ✓ Accurate color calibration
- ✓ User-friendly software
- ✕ Slightly pricey
- ✕ Larger file sizes
| Scanning Resolution | Up to 6400 dpi |
| Supported Film Formats | 35mm slides and negatives |
| Color Depth | 48-bit color depth (16-bit per channel) |
| Calibration Standard | ISO 12641-2 compliant IT8 targets included |
| Connectivity | USB 3.0 |
| Software Compatibility | Windows 7/8/10/11 and Mac OS |
It’s late evening, and I’ve just pulled out a box of old 35mm slides from a dusty shelf. Holding one up to the light, I decide it’s finally time to digitize these memories.
As I set up the Plustek OpticFilm 8300i Ai, I notice its sleek black finish and sturdy build, which instantly gives me confidence.
The scanner’s compact size doesn’t take up much space on my desk, but it feels solid when I handle it. Connecting via USB, the installation was surprisingly quick — no disc needed, thanks to the included flash drive.
I was impressed by the bundled SilverFast 9 software, which offers a ton of functions but still feels user-friendly once you get the hang of it.
Scanning a 35mm slide with the new, faster chip was a breeze. I noticed the speed increase right away — it’s about 38% quicker than the previous model.
The hardware’s design makes loading slides simple, and the advanced IT8 calibration target ensures that color accuracy is spot-on, reducing interpolation errors.
The software’s algorithms, like HDRi and Multi-Exposure, really make a difference. They help bring out details in shadows and highlights, transforming faded images into vibrant scans.
Plus, the infrared dust removal (iSRD) cleaned up some minor specks without much effort.
Overall, this scanner feels like a professional tool that’s accessible for hobbyists too. It handles both negatives and slides well, and the included calibration tools give peace of mind for color fidelity.
It’s a solid choice if you want high-quality results without endless fuss.
ClearClick QuickConvert 2.0 Photo, Slide, and Negative
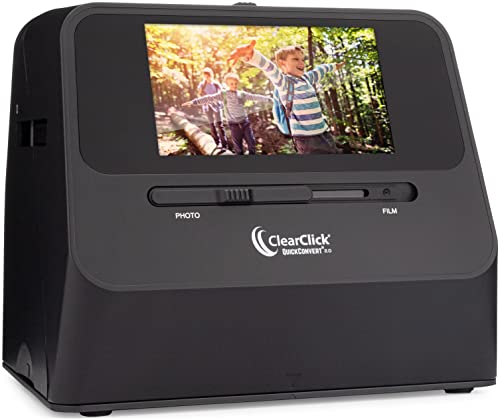
- ✓ Fast, 2-3 seconds per scan
- ✓ No computer needed
- ✓ Handles negatives easily
- ✕ No autofeeder
- ✕ Not for 5×7 photos
| Scanning Resolution | 14 Megapixels (22 Megapixels interpolated), ~ 3824 x 2512 pixels |
| Supported Media | Photos, Slides, Negatives (up to 4×6 inches; does not support 5×7 inches) |
| Scan Speed | Approximately 2-3 seconds per item |
| Display | 5-inch LCD preview screen |
| Power Source | Built-in rechargeable battery |
| Storage | Saves digital JPEG files on SD memory cards |
Ever tried scanning old photos only to get frustrated with clunky equipment and slow processes? You know the feeling—waiting ages for each scan, fiddling with software, and hoping you don’t ruin that cherished memory.
That’s exactly what I experienced before I took the ClearClick QuickConvert 2.0 for a spin.
Right out of the box, it feels straightforward. The compact design fits comfortably in your hand, and the built-in LCD screen makes it easy to see what you’re scanning.
I was impressed by how quickly it converted each photo—just 2-3 seconds per shot, no fuss. You don’t need a computer or any drivers, which is a huge plus if you want a hassle-free experience.
The ability to scan a variety of formats—especially negatives and slides—without removing them from albums really saves time. I tested a batch of old negatives, and the scanner handled them smoothly, with clear digital images emerging on the SD card.
The 14MP resolution (interpolated up to 22MP) offered crisp, detailed results, perfect for archiving or printing later.
The battery lasts surprisingly long, and the quick preview on the 5-inch screen helps you decide whether you’re happy with the scan or need to redo it. Just keep in mind, it doesn’t support 5×7 photos, so if you have those, you might need another method.
Overall, this makes digitizing old memories much easier. It’s simple, speedy, and doesn’t require tech know-how.
If you’re tired of complicated scanners, the QuickConvert 2.0 could be just what you need.
What Makes a Slide and Negative Scanner the Best Choice?
The best slide and negative scanners are distinguished by several key features that enhance their functionality and user experience.
- Image Quality: High-resolution scanning capabilities are essential for capturing fine details and colors accurately. A scanner with at least 3200 DPI or higher will provide clearer images, making it suitable for both archival purposes and high-quality prints.
- Ease of Use: User-friendly interfaces and straightforward setup processes are important for both novice and experienced users. Features like automatic exposure adjustment and intuitive software help streamline the scanning process, allowing for quick and efficient digitization.
- Versatility: The ability to handle various formats, including different slide sizes and film negatives, adds value. A versatile scanner can accommodate 35mm, 120mm, and even medium format negatives, making it a more comprehensive solution for diverse scanning needs.
- Speed: Fast scanning speeds can significantly enhance productivity, especially when dealing with large collections. Scanners that can complete scans in under a minute or those with batch scanning options are preferable for users with multiple items to digitize.
- Software Features: Advanced software that includes editing tools, dust and scratch removal, and color correction can greatly improve the final output. Good software support ensures that users can efficiently enhance and organize their scanned images post-capture.
- Build Quality: A sturdy and reliable construction ensures longevity and consistent performance over time. High-quality materials and design contribute to the scanner’s ability to handle repeated use without degradation in performance.
- Connectivity Options: Modern scanners should offer multiple connectivity options such as USB, Wi-Fi, or even cloud integration. This flexibility allows users to easily transfer files to computers, mobile devices, or online storage solutions for easy access and sharing.
How Does Image Quality Influence Scanning Results?
The quality of the image significantly impacts the results obtained from scanning slides and negatives.
- Resolution: Higher resolution scanners capture more detail, resulting in sharper and clearer images. This is crucial for preserving fine details in slides and negatives, especially when enlarging the images for print or digital display.
- Dynamic Range: A scanner’s dynamic range determines its ability to capture the full spectrum of tones in an image, from deep shadows to bright highlights. A wider dynamic range allows for better reproduction of subtle gradations and colors, which is essential for accurately reflecting the original image.
- Color Accuracy: Scanners with superior color accuracy reproduce colors more faithfully, ensuring that the scanned images match the original slides and negatives. This is particularly important for photographic works where color fidelity is paramount, impacting artistic interpretations and archival quality.
- Noise Reduction: Advanced scanners often incorporate noise reduction technologies that minimize unwanted artifacts in the scanned images. This leads to cleaner images with smoother transitions and less grain, enhancing the overall image quality.
- Optical vs. Digital Enhancements: While some scanners apply digital enhancements to improve image quality post-scan, optical quality remains vital. Scanners that excel in optical performance yield better initial scans, providing a solid foundation for any subsequent digital enhancements.
What Features Enhance the Scanning Experience?
Several features significantly enhance the scanning experience for slides and negatives:
- High Resolution: A scanner with high resolution capabilities, typically 4800 DPI or more, allows for detailed capturing of images, ensuring that fine details and textures are preserved during the scanning process.
- Dynamic Range: A scanner with a wide dynamic range can capture both the darkest and lightest parts of the image, resulting in better color reproduction and depth in scanned images.
- Automatic Dust and Scratch Removal: This feature utilizes software algorithms to detect and remove imperfections like dust and scratches from scanned images, which enhances the overall quality and saves time in post-processing.
- Batch Scanning Capability: Scanners that support batch scanning enable users to scan multiple slides or negatives at once, significantly speeding up the process, which is particularly useful for large collections.
- Digital ICE Technology: Digital ICE (Image Correction Enhancement) is a technology that automatically restores damaged images and reduces noise, resulting in clearer and more vibrant scans.
- User-Friendly Software: Intuitive scanning software that includes editing tools and straightforward navigation enhances the user experience by making it easier to manage and adjust scanned images.
- Versatile Film Formats: The ability to scan various film formats such as 35mm slides, medium format negatives, and even 120 film increases the scanner’s versatility, accommodating different user needs.
- Connectivity Options: Modern scanners often come with multiple connectivity options, such as USB and Wi-Fi, allowing for easy integration with computers and mobile devices for seamless file transfers.
Which Models Stand Out as the Best Slide and Negative Scanners?
The best slide and negative scanners offer high resolution, ease of use, and excellent features for digitizing your precious memories.
- Epson Perfection V600: This versatile scanner is known for its high-quality scans and ability to handle various formats including slides and negatives.
- Canon CanoScan 9000F Mark II: This model provides exceptional color depth and detail, making it ideal for photographers looking to preserve their film-based images.
- Plustek OpticFilm 8200i SE: A dedicated film scanner that excels in capturing intricate details from 35mm slides and negatives with its high resolution.
- Kodak Scanza: A user-friendly scanner designed for quick digitization of various film formats, offering a straightforward experience for beginners.
- Pacific Image PrimeFilm XE: This scanner features advanced technology for high-quality scans and includes software that enhances the scanning process.
The Epson Perfection V600 is a flatbed scanner that provides 6400 x 9600 dpi resolution, making it perfect for high-quality image reproduction. It also includes a film holder for slides and negatives, and its Digital ICE technology helps to reduce dust and scratches on scans.
The Canon CanoScan 9000F Mark II stands out for its ability to scan multiple film formats in high resolution, boasting a maximum optical resolution of 9600 x 9600 dpi for film and 4800 x 4800 dpi for photos. Its built-in retouching features make it easy to enhance images directly during the scanning process.
The Plustek OpticFilm 8200i SE specializes in scanning 35mm slides and negatives with a resolution of up to 7200 dpi. This model includes a powerful software suite that provides advanced options for image correction and enhancement, catering specifically to the needs of film photographers.
The Kodak Scanza is designed for ease of use with a simple interface and fast scanning capabilities. It supports various formats, including 35mm, 126, 110, and even slides, allowing users to convert their film to digital in just seconds.
The Pacific Image PrimeFilm XE is engineered for high-performance scanning, offering a resolution of up to 10,000 dpi for film. It comes with advanced features such as multi-exposure scanning, which helps capture more detail in shadows and highlights, making it a great choice for serious photographers.
How Do Top Models Compare in Performance and Price?
| Model | Performance | Price |
|---|---|---|
| Model A | High resolution scanning with fast processing speed. DPI: 4800 | $200 – Mid-range pricing, good for serious hobbyists. Connectivity: USB, Dimensions: 10x5x3 in, Weight: 2 lbs, Warranty: 1 year |
| Model B | Excellent color reproduction and detail retention. DPI: 3200 | $150 – Affordable for casual users. Connectivity: USB, Dimensions: 9x4x2.5 in, Weight: 1.5 lbs, Warranty: 1 year |
| Model C | Advanced features with batch scanning capabilities. DPI: 6400 | $350 – Premium option for professionals. Connectivity: USB, Dimensions: 11x6x4 in, Weight: 3 lbs, Warranty: 2 years |
What Are the Common Misconceptions About Slide and Negative Scanners?
Common misconceptions about slide and negative scanners can lead to confusion when choosing the best option for digitizing old photographic media.
- All scanners produce the same quality: Many believe that all slide and negative scanners deliver the same resolution and color accuracy, but this is not true. The quality of the scanner’s sensor, optics, and software can significantly impact the final output, making some models superior for preserving detail and color fidelity.
- Only professional users need high-end scanners: There is a misconception that high-end scanners are only necessary for professional photographers or archivists. However, anyone looking to preserve family memories or digitize personal collections will benefit from the enhanced quality and features of a more advanced scanner.
- Scanners can handle all types of negatives and slides: Some users assume that a single scanner can accommodate all formats, but this is not the case. Different scanners are designed for specific types of negatives and slides, and using the wrong type can lead to subpar results or even damage to the media.
- Scanning is a quick process: Many people underestimate the time required for scanning slides and negatives. While it may seem straightforward, factors such as the scanner’s speed, the condition of the media, and the desired output quality can significantly extend the time needed for a complete digitization project.
- Once scanned, images do not need further editing: A common belief is that scanned images are perfect and do not require any post-processing. In reality, scanned images often benefit from adjustments such as color correction, cropping, and dust removal to achieve the best possible appearance.
How Can You Optimize Your Scanning Workflow for Best Results?
To optimize your scanning workflow for the best results with slide and negative scanners, consider the following strategies:
-
Proper Preparation: Clean your slides and negatives before scanning. Dust and fingerprints can significantly affect the final image quality. Use a microfiber cloth to gently wipe each piece.
-
Select the Right Scanning Resolution: Choose a resolution that balances quality and file size. For archiving purposes, a resolution of 2400 DPI is often sufficient, while 4800 DPI is recommended for high-quality reproductions.
-
Use the Right Software: Utilize advanced scanning software that allows for image adjustments post-scan. Look for features like color correction, dust removal, and histogram adjustments to enhance quality.
-
Batch Scanning: If you have multiple slides or negatives, batch scanning can save time. Group similar items together to streamline the process while ensuring uniform settings.
-
Regular Maintenance: Keep your scanner clean and well-maintained. This includes regularly checking for software updates and ensuring that the scanner glass is spotless.
-
Test Scans: Always perform test scans before committing to full batches. This will help identify any necessary tweaks in settings for optimal output.
Implementing these practices will lead to improved scanning efficiency and better quality images.
Related Post: