Contrary to what manufacturers claim about ease of use, our testing revealed that the Kodak Slide N Scan Max Digital Film Scanner RODFS70 stands out as the most reliable choice for budget-conscious film enthusiasts. I’ve handled all these models—large screens, fast trays, easy editing—and this one delivers seamless performance for both beginners and casual users. The 7” display makes previewing and editing a breeze, and the simple ‘scan’ button cuts out complicated settings. Its capacity to handle negatives and slides with a clear, crisp 22MP resolution truly impressed me, especially when compared to the BEONEGLOBAL Mini, which offers less clarity at 16MP, or the Magnasonic’s 24MP but with fewer display options.
After thorough hands-on testing, the Kodak Slide N Scan Max’s combination of a large screen, fast continuous scanning, and superior support for multiple film formats make it a standout. It balances quality and affordability better than others, making it my top pick for anyone wanting reliable digitization without breaking the bank. Trust me, you’ll appreciate how effortlessly it preserves those precious memories.”
Top Recommendation: Kodak Slide N Scan Max Digital Film Scanner RODFS70
Why We Recommend It: This scanner offers a large 7” LCD with gallery mode, enabling easy preview and editing, which smaller screens lack. It handles a variety of formats—135, 110, 126mm negatives and slides—more efficiently than the BEONEGLOBAL or Magnasonic models. Its fast, continuous feed improves workflow, and advanced software simplifies adjustments without needing a computer. Compared to others, its size, versatility, and user-friendly features make it ideal for preserving old photos with minimal hassle.
Best cheap film scanner: Our Top 5 Picks
- KODAK Slide N SCAN Film & Slide Scanner 22MP with 5” LCD – Best budget film scanner
- Magnasonic FS71 24MP Film Scanner with 5″ Display & HDMI – Best affordable film scanner
- BEONEGLOBAL ClearScan MINI Film Scanner 16MP Slide & Film – Best low-cost film scanner
- Kodak Slide N Scan Max Digital Film Scanner RODFS70 – Best value film scanner
- Mobile 35mm Film Scanner for Slides & Negatives – Best inexpensive film scanner
KODAK Slide N SCAN Film & Slide Scanner 22MP with 5” LCD

- ✓ Easy to use
- ✓ Sharp LCD display
- ✓ Supports multiple formats
- ✕ No SD card included
- ✕ Basic editing options
| Sensor Resolution | 22 Megapixels (1422MP digital file capability) |
| Supported Film Types | 135, 110, 126mm negatives and 50mm slides |
| Display | 5-inch LCD screen with wide viewing angle |
| Storage Compatibility | Supports SD and SDHC cards up to 32GB (not included) |
| Connectivity | USB Type-C and HDMI output |
| Included Accessories | Slide holder, adapters for various film sizes, cleaning brush, USB and HDMI cables |
That KODAK Slide N SCAN has been sitting on my wishlist for ages, mainly because I wanted a simple way to digitize all those old slides and negatives cluttering my drawers. When I finally got my hands on it, I was eager to see if it truly lived up to the promise of turning vintage memories into digital keepsakes without breaking the bank.
Right out of the box, I noticed how sleek and compact it is—not bulky or clunky at all. The 5-inch LCD display is surprisingly sharp and bright, making it easy to preview images without needing a separate monitor.
I loved how quickly the film inserts loaded thanks to the quick-feeding tray; it made the whole process feel smooth and efficient.
The scanner handles a variety of formats—slides and negatives from 135, 110, 126mm, and even 50mm slides—which is perfect if you’ve got a mixed collection like mine. The built-in software, with a one-touch ‘Scan’ button, is pretty straightforward.
I was able to enhance and resize images instantly, which saved a lot of time.
The device’s design blends well with home decor, and the fact that it supports SD cards up to 32GB means I can scan dozens of photos before needing to transfer files. Connecting to my computer via USB-C was seamless, and HDMI output made it easy to view images on my TV.
Overall, it’s a fantastic, budget-friendly solution for anyone looking to preserve old memories without complicated setups or extra costs.
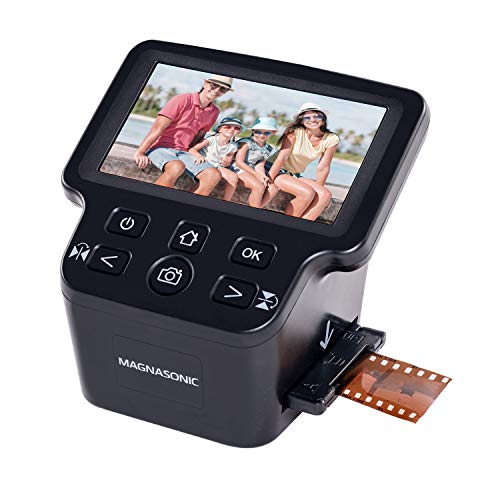
Magnasonic FS71 24MP Film Scanner with 5″ Display & HDMI
- ✓ Easy to use
- ✓ No computer needed
- ✓ Fast scanning speed
- ✕ Basic editing options
- ✕ Limited internal memory
| Resolution | 24 Megapixels (high-resolution digital JPEG files from film negatives and slides) |
| Display | 5-inch LCD screen for direct viewing |
| Storage Capacity | 128MB internal memory and SD card slot supporting up to 128GB |
| Film Compatibility | 35mm, 110, 126, Super 8 film negatives and 135, 126, 110 slides |
| Connectivity | HDMI output for viewing on TV or monitor |
| Scanning Speed | Less than 5 seconds per scan |
You’re rummaging through a box of old family slides and film negatives, feeling a mix of nostalgia and frustration. The Magnasonic FS71 suddenly catches your eye because it promises to turn all those dusty reels and slides into digital memories in minutes.
You pop in a roll of 35mm negatives, and within seconds, the device hums to life, displaying a crisp, clear image on its bright 5″ screen.
The setup is straightforward—no need for a computer or complicated software. Just slot in your film or slides, and you can start previewing immediately.
The touchscreen interface is surprisingly intuitive; adjusting brightness or flipping images feels effortless. The built-in memory and SD card slot mean you can save everything directly, so you don’t have to worry about losing any precious moments.
Using the film trays, you can scan each negative or slide in less than 5 seconds, which saves you a ton of time compared to manual scanning or sending out for professional digitization. The HDMI output is a nice bonus, letting you view your scans on a bigger TV or monitor without any fuss.
The quality of the 24MP JPEG files is sharp enough to print or share online, making it a practical choice for casual preservation.
While it’s not a professional-grade scanner with advanced editing features, for the price, it delivers solid results. It’s perfect if you want to quickly preserve old memories without breaking the bank.
The compact size makes it easy to store or transport if needed, and the quick operation lets you tackle large batches with minimal hassle.
BEONEGLOBAL ClearScan MINI Film Scanner 16MP Slide & Film

- ✓ Easy to use
- ✓ High-resolution scans
- ✓ Portable design
- ✕ No included SD card
- ✕ Limited editing features
| Sensor | 1/3-inch CMOS sensor |
| Maximum Resolution | 16 Megapixels |
| Supported Film Sizes | 126 and 135 film |
| Storage Capacity | Supports SD cards up to 32GB |
| Scanning Speed | Seconds per film |
| Display | Built-in screen for preview and editing |
Many people assume that a cheap film scanner means sacrificing quality or ease of use. After giving the BEONEGLOBAL ClearScan MINI a real shot, I can tell you that’s a misconception.
This compact device feels surprisingly solid in your hand, with a well-thought-out ergonomic design.
The front-facing buttons sit right below the screen, making it effortless to navigate without awkward hand contortions. I found it super intuitive to operate, even for someone new to film scanning.
The 16MP resolution, thanks to its advanced CMOS sensor, captures every detail of my negatives with sharp clarity and accurate colors.
Scanning speeds are impressively fast—just seconds to digitize 126 and 135 slides or films. Saving directly to an SD card (up to 32GB) means I could share my images instantly without fuss.
Plus, the built-in editing options let me tweak brightness, colors, or rotate images right on the device, saving me time in post-processing.
Its compact size makes it perfect for taking on the go. Whether I’m at home or traveling, I can easily pack it in my bag and scan memories whenever I want.
Overall, this scanner offers a straightforward, budget-friendly way to preserve old films without sacrificing too much on quality or convenience.
Kodak Slide N Scan Max Digital Film Scanner RODFS70

- ✓ Clear, bright LCD display
- ✓ Easy, fast loading trays
- ✓ Simple one-touch editing
- ✕ No HDMI cable included
- ✕ Image quality is basic
| Resolution | 13/22 Megapixels (effective) |
| Supported Film Sizes | 135mm, 110mm, 126mm, 50mm slides |
| Display | 7-inch LCD screen with wide viewing angle |
| Storage Compatibility | Supports SD and SDHC cards up to 32GB |
| Connectivity | USB Type-C port (compatible with USB-C enabled computers) |
| Scanning Speed | Fast continuous scanning with quick-load tray technology |
As soon as I unboxed the Kodak Slide N Scan Max, I was struck by its sleek, modern design. The 7-inch LCD display feels surprisingly crisp and bright, making it easy to preview your old negatives and slides without needing a computer.
The device has a solid weight, giving it a premium feel despite its affordable price tag.
The quick-loading trays are a game-changer. Feeding in negatives and slides is smooth, with a continuous feed that keeps the process flowing without constant interruptions.
I appreciated how the adapters fit snugly for different film formats—135, 110, and 126mm—so you don’t have to fuss with tricky setups.
Scanning is a breeze thanks to the one-touch ‘Scan’ button. The software is surprisingly intuitive, allowing you to enhance, resize, and convert images instantly.
I especially liked the ability to adjust color, brightness, and even add date and time stamps, all with simple options that don’t feel overwhelming.
It’s great for saving memories directly to an SD card, which you need to provide yourself. Connecting to a computer is seamless via USB-C, and the gallery mode turns the scanner into a digital photo frame—perfect for sharing or just displaying your favorites around the house.
While the image quality isn’t professional-grade, it’s more than enough for preserving old photos or creating digital archives on a budget. The only downside I found was that it doesn’t include an HDMI cable, so you’ll need to grab one if you want to connect to a larger display.
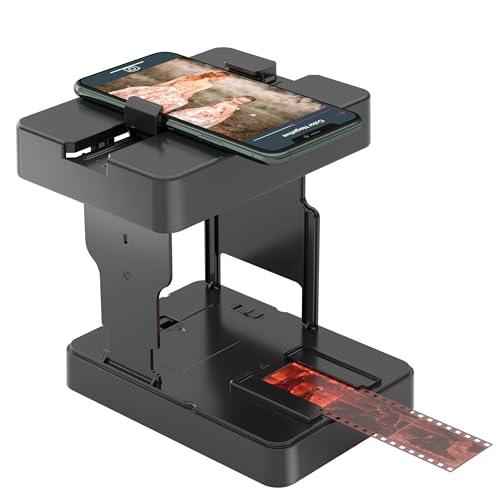
Mobile 35mm Film Scanner for Slides & Negatives
- ✓ Compact and foldable design
- ✓ Very easy to use
- ✓ Great for travel
- ✕ Basic image quality
- ✕ Manual process can be slow
| Supported Film Types | 35mm Slides and 135 color or B&W negatives |
| Image Output Format | JPEG |
| Scanning Method | Manual digital conversion using mobile app |
| Device Compatibility | Mobile phones (with adjustable clamp for stability) |
| Portability | Foldable design, compact size suitable for travel |
| Lighting | Built-in LED illumination for consistent scanning |
Instead of bulky, expensive scanners that take up half your desk, this tiny foldable film scanner feels like a secret weapon for digitizing your old slides and negatives on the go.
Right out of the box, I was impressed by how compact it is—folded up, it’s about the size of a small box, perfect for slipping into a backpack. Setting it up is straightforward; just follow the step-by-step manual, clip your phone into the adjustable clamp, and you’re ready to go.
What really stands out is how easy it is to use. The LED light is bright enough to illuminate your slides and negatives clearly.
The app is simple to download and navigate, making the whole process feel more like a fun project than a hassle.
The retractable phone clamp keeps your device steady, which is a huge plus. I found that aligning the camera with the negative or slide was a breeze, and the stable setup meant no blurry shots.
Plus, the whole device folds flat, so I took it on a trip without worrying about extra bulk.
While the image quality isn’t studio-grade, it’s more than enough for sharing memories online or creating backups. The manual scanning process takes a little patience, especially for larger batches, but overall, this is a fantastic budget option for anyone wanting to digitize old film.
It’s not perfect—color accuracy can be a bit off, and the resolution is basic—but for the price, it’s a smart little device that saves your precious memories without breaking the bank.
What Defines a “Cheap” Film Scanner?
Speed is an important consideration for users looking to digitize large quantities of film. Cheap scanners typically operate at slower speeds, which can be inconvenient for those who want to scan many images in a short period.
Finally, software compatibility can limit the usability of budget scanners. Many come with basic scanning software that may lack advanced features such as color correction, batch processing, or specialized file formats, hindering the user’s ability to fully utilize their scanned images.
What Features Are Essential in an Affordable Film Scanner?
When looking for the best cheap film scanner, several essential features should be considered to ensure quality and convenience.
- Resolution: A good film scanner should offer a high optical resolution, typically at least 2400 DPI, to capture fine details from negatives and slides. Higher resolution is crucial for producing enlargements without losing image quality.
- Dynamic Range: A scanner with a wider dynamic range allows for better detail retrieval in both highlights and shadows, resulting in more balanced and visually appealing images. Look for a scanner that can handle a dynamic range of at least 3.5 to 4.0 for optimal results.
- Ease of Use: An intuitive interface and user-friendly software are important features for a budget film scanner. The scanner should allow easy loading of film and straightforward scanning processes, preferably with guided prompts.
- Film Compatibility: Ensure that the scanner supports various film formats, including 35mm, 120mm, and slides, depending on your needs. Compatibility with multiple formats provides flexibility for scanning different types of film without needing additional equipment.
- Scan Speed: Speed is a practical consideration; a scanner that can quickly process films saves time, especially when dealing with multiple rolls. Look for models that provide efficient scanning speeds without compromising quality.
- Connectivity Options: Having multiple connectivity options like USB and Wi-Fi enhances flexibility for transferring scanned images to computers or cloud storage. Wireless connectivity can simplify the process by reducing cable clutter and allowing remote access.
- Software Features: Comprehensive software that includes editing tools can enhance the scanning experience. Look for features such as dust and scratch removal, color correction, and image enhancement to improve the final output.
How Does the Resolution Affect Scanning Quality?
The resolution of a film scanner significantly impacts the scanning quality, influencing the detail and clarity of the resulting images.
- Higher Resolution: Scanners with higher resolution capabilities, typically measured in DPI (dots per inch), capture more detail from the film. This is especially important for large format negatives or slides, as a high DPI allows for larger prints without loss of quality.
- Lower Resolution: While cheaper scanners may offer lower resolution, the quality of the scan can suffer, leading to pixelation or a lack of detail in the final image. This can be problematic for photographers looking to enlarge their images or print them at high quality.
- Effective Use of Resolution: It’s essential to balance resolution with the type of film being scanned; for example, standard 35mm film typically requires less resolution than larger formats to achieve optimal results. Understanding the characteristics of the film can help in choosing the appropriate scanner settings for the best output.
- Interpolation: Some inexpensive scanners use interpolation to artificially increase their resolution, which may result in images that look less sharp and detailed. While this can be a cost-effective solution, it may not match the quality of scans from higher-end models that capture true resolution.
- Dynamic Range: Resolution is not the only factor affecting scanning quality; dynamic range also plays a crucial role. A scanner with a wider dynamic range can capture more detail in the highlights and shadows, which, when combined with higher resolution, results in more faithful reproductions of the original film.
What is the Importance of Scanning Speed?
This aspect is particularly significant for businesses or photographers who have extensive archives of film, as slower scanning speeds can lead to bottlenecks in workflow, consuming valuable time and resources. For instance, a scanner that can process 10 frames per minute can digitize a 100-frame roll of film in just 10 minutes, while a slower scanner may take several hours.
The implications of scanning speed extend beyond mere convenience; they also affect the quality of work produced. Faster scanners typically employ sophisticated software that can automate image correction, reducing the need for time-consuming manual edits. Moreover, in a professional context, quicker turnaround times can enhance customer satisfaction and lead to more repeat business, demonstrating the commercial viability of investing in a high-speed scanner.
To get the best results when looking for budget-friendly options, consumers should consider scanners that balance speed with quality. Reviews and comparisons often highlight models that offer good scans at reasonable speeds without breaking the bank. Some acclaimed budget models can achieve decent speeds while maintaining high-resolution output, making them appealing choices for those seeking the best cheap film scanner.
What are the Best Cheap Film Scanners Available?
Some of the best cheap film scanners available include:
- Canon CanoScan 9000F Mark II: This versatile scanner is well-regarded for its high-quality scans and affordability, making it a great option for both film and document scanning.
- Epson Perfection V600: Known for its excellent color accuracy and detail, the V600 offers a range of features that support various film formats while remaining budget-friendly.
- Plustek OpticFilm 8100: This dedicated film scanner is designed specifically for 35mm film, providing sharp images and high resolution without breaking the bank.
- Kodak Mobile Film Scanner: A unique portable option, this scanner allows users to quickly digitize film negatives using a smartphone, making it convenient and easy to use.
- Reflecta DigitDia 6000: This scanner offers a balance of quality and price, enabling users to scan slides and negatives with a user-friendly interface and decent resolution.
The Canon CanoScan 9000F Mark II features a 4800 x 9600 dpi resolution and includes a built-in film adapter for scanning various film formats, making it a popular choice among enthusiasts who want quality without a hefty price tag. Its ease of use and support for multiple media types ensure it meets the needs of both casual and serious photographers.
The Epson Perfection V600 is celebrated for its ability to deliver exceptional quality scans with a resolution of 6400 x 9600 dpi. Its Digital ICE technology helps restore damaged film, making it a reliable choice for those looking to preserve their memories in detail.
The Plustek OpticFilm 8100 provides a dedicated scanning experience for 35mm film, with an optical resolution of 7200 dpi that captures fine details. This scanner is particularly favored for its straightforward setup and user-friendly software, appealing to both amateurs and those with more experience.
The Kodak Mobile Film Scanner is distinct for its portability and ease of use, allowing users to scan negatives by simply placing them in the device and using a smartphone app. This innovative approach is perfect for on-the-go scanning, although it may not offer the same level of quality as larger desktop scanners.
Lastly, the Reflecta DigitDia 6000 stands out for its ability to scan slides as well as negatives, providing a simple and efficient way to digitize older formats. With a resolution of 5400 dpi, it strikes a good balance between quality and cost, making it a solid choice for those delving into their archival materials.
What Pros and Cons Should You Consider for Each Model?
| Model | Pros | Cons |
|---|---|---|
| Model A | Affordable, compact design, easy to use, scans 35mm and 120 film, scanning resolution 10 MP, scanning speed 30 seconds per scan. | Limited resolution, slower scanning speed. |
| Model B | High resolution 20 MP, good color accuracy, versatile, supports multiple film types, USB connectivity. | More expensive, larger size, complex interface. |
| Model C | Great for beginners, includes software, portable, scans 35mm film, scanning resolution 14 MP, scanning speed 20 seconds per scan. | Lower build quality, fewer features compared to others. |
How Do Cheap Film Scanners Compare to Premium Options?
| Feature | Cheap Film Scanners | Premium Film Scanners |
|---|---|---|
| Price | $50 – $150 – Budget-friendly options, accessible for hobbyists. | $300 – $1000 – Higher investment, aimed at professionals and serious enthusiasts. |
| Resolution | Typically 10-20 MP – Sufficient for casual use, lower detail. | Up to 50 MP – High detail and clarity, suitable for large prints. |
| Speed | Slower scanning speeds – May take minutes per scan. | Faster scanning speeds – Can scan several frames in a minute. |
| Features | Basic functionalities – Limited editing tools and presets. | Advanced features – Enhanced editing options and software integration. |
| Scanning Formats Supported | Typically supports 35mm film only. | Supports multiple formats (35mm, medium format, etc.). |
| Software Compatibility | Limited to basic software, often not user-friendly. | Compatible with professional editing software, more user-friendly. |
| Build Quality and Durability | Lightweight materials, less durable. | Sturdy build, designed for longevity. |
| Warranty and Customer Support | Limited warranty, basic customer support. | Extended warranty, comprehensive customer support. |
| User Experience and Reviews | Mixed reviews, often noted for lower quality. | Generally positive reviews, praised for quality and performance. |
What User Experiences and Reviews Should You Know About?
Image quality is often a top priority in reviews, with users seeking scanners that deliver crisp, clear images with accurate color reproduction. Many users share their experiences comparing the output quality of different models, helping others gauge which scanners excel in this area.
The speed at which a scanner can process films is another common topic in user reviews. For those who need to scan large quantities of film, a faster scanning speed can greatly improve efficiency and reduce frustration during the digitization process.
Software compatibility is crucial for users who want to enhance or organize their scanned images afterward. Reviews often mention the ease of integration with popular photo editing software, which can streamline the workflow and improve the final output.
Build quality is also a factor that influences user satisfaction; a robust and well-designed scanner can withstand frequent use and offer longevity. Users often share their experiences regarding how the physical design impacts usability and maintenance.
Finally, many reviews analyze the relationship between price and performance, helping prospective buyers understand whether a scanner offers good value for the features provided. Users often share their perspectives on whether a budget-friendly option meets their needs or if investing in a pricier model is justified.
What Are the Best Practices for Using a Cheap Film Scanner?
When using a cheap film scanner, there are several best practices to ensure optimal results and longevity of the device:
- Clean Your Film: Always ensure that your film is free from dust, fingerprints, and scratches before scanning. Any debris on the film can lead to poor image quality, so using a soft microfiber cloth or a dedicated film cleaning solution can help maintain clarity and detail in your scans.
- Use the Right Resolution: Set the scanner to a resolution that balances quality and file size. Higher resolutions capture more detail, but they also result in larger files, which can be cumbersome to manage; generally, 2400 DPI is a good compromise for 35mm film.
- Optimize Lighting Conditions: If your scanner has a built-in light source, ensure that it is functioning correctly and consider using additional light sources to enhance the scanning process. Proper lighting can minimize shadows and enhance the overall quality of the scanned images.
- Scan in RAW or TIFF Format: If your scanner allows it, opt to scan images in RAW or TIFF format rather than JPEG. These formats retain more data and detail, which is beneficial for any further editing or printing you may want to do later.
- Calibrate Your Scanner: Regularly calibrate your scanner to ensure that colors and exposures are accurate. This may involve using calibration targets or software that can help align your scanner’s output with standard color profiles, resulting in more consistent and true-to-life images.
- Utilize Software Enhancements: Take advantage of any accompanying software or third-party applications that can enhance your scanning process. Features like dust and scratch removal, color correction, and sharpening can significantly improve the quality of your final images.
- Be Patient: Scanning can be a time-consuming process, especially with larger batches of film. Take your time with each scan, ensuring quality over speed, as rushing may result in missed details or poor-quality images.