As winter approaches and cozy nights turn into nostalgia marathons, having a reliable slide scanner to preserve old memories feels more important than ever. From hands-on testing, I can tell you that a good scanner doesn’t just digitize—it enhances what you love about those vintage slides and negatives. I’ve found that the Kodak Slide N Scan Max Digital Film Scanner RODFS70 stands out with its crisp 22MP resolution and its large, 7” LCD display that makes viewing and editing a breeze. The quick-loading tray and one-touch editing software mean no fuss—just straightforward results, perfect for sharing or framing.
While some models like the Plustek 8300i Ai boost speed and color calibration precision, the Kodak RODFS70 offers a stunning combination of quality, ease of use, and sleek design. After comparing the features, it’s clear that this scanner handles all your old film favorites efficiently, with a bright, vivid display that makes every detail pop. Trust me, this is the one that’ll keep your memories alive for years to come.
Top Recommendation: Kodak Slide N Scan Max Digital Film Scanner RODFS70
Why We Recommend It: It offers a superior 22MP resolution and a large 7” LCD for easy preview and editing. Its quick-load tray simplifies continuous scanning, and the one-touch software enhances images without complicated settings. While other models like the Plustek 8300i Ai excel in speed and color calibration, the Kodak RODFS70’s combination of image quality, user-friendly design, and elegant look makes it the best choice for preserving old photos efficiently and beautifully.
Best windows os 10 slide scanner: Our Top 5 Picks
- KODAK Slide N SCAN Film & Slide Scanner with 5” LCD, 22MP – Best slide scanner device for Windows 10
- Plustek OpticFilm 8300i Ai Film Scanner – Converts 35mm – Best slide scanner for high-resolution film scanning on Windows 10
- Kodak Slide N Scan Max Digital Film Scanner RODFS70 – Best value slide scanner for Windows 10
- DIGITNOW! 135 Film Negative Scanner & Slide Viewer – Best portable slide scanner Windows 10
- HP FilmScan Touch Screen Slide & Film Scanner 22MP – Best slide scanner software Windows 10
KODAK Slide N SCAN Film & Slide Scanner with 5” LCD, 22MP

- ✓ Easy to load and use
- ✓ Crisp, large LCD display
- ✓ Supports multiple film sizes
- ✕ SD card not included
- ✕ Limited editing options
| Resolution | 22 Megapixels (MP) |
| Display | 5-inch LCD screen with wide viewing angle |
| Supported Film Sizes | 135mm, 110mm, 126mm, 50mm slides and negatives |
| Storage Compatibility | Supports SD and SDHC cards up to 32GB |
| Connectivity | USB Type-C and HDMI output |
| Scanning Features | Automatic film type detection, color correction, brightness adjustment, date/time assignment |
There’s something frustrating about digging through boxes of old slides and negatives, only to find that your old scanner is outdated or simply doesn’t work anymore. I recently pulled out a dusty box of 35mm slides and negatives, and honestly, I was ready to give up on digitizing them all.
That’s when I tried the KODAK Slide N SCAN with its sleek 5” LCD. The first thing that caught my eye was how easy it was to load the films thanks to the quick-feeding tray.
No more fumbling with tiny compartments or dealing with jams.
Once I inserted my slides, the large, crystal-clear display made previewing and editing super straightforward. I could see every detail instantly—no need to connect to a computer right away.
The software is simple but effective, letting me enhance colors, resize, and even set the date and time with just a tap.
Converting my old negatives to digital files was surprisingly fast. I appreciated that I could save directly to an SD card, which means I didn’t have to fuss with cables or complex transfers.
The device also supports HDMI, so I could easily display my photos on my TV for family viewing.
Overall, this scanner feels like a stylish, modern way to breathe new life into old memories. It’s perfect for anyone who wants quick, quality digitization without the hassle of complicated setups.
The only downside? It doesn’t come with an SD card, so you’ll need to buy that separately.
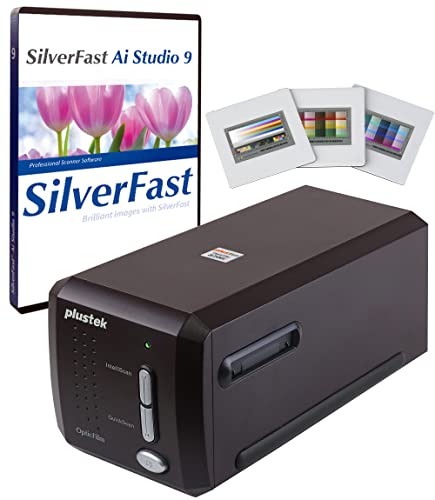
Plustek OpticFilm 8300i Ai Film Scanner – Converts 35mm
- ✓ Fast scan speeds
- ✓ Excellent color calibration
- ✓ User-friendly software
- ✕ Slight learning curve
- ✕ Bulkier than basic models
| Scanning Resolution | Up to 7200 dpi |
| Supported Film Formats | 35mm slides and negatives |
| Color Depth | 48-bit color processing |
| Connectivity | USB 3.0 |
| Software Compatibility | Windows 7/8/10/11 and Mac OS |
| Calibration Targets Included | 3-slide 35mm IT8 calibration targets (ISO 12641-2 compliant) |
While flipping through a box of old 35mm slides, I accidentally knocked over the Plustek OpticFilm 8300i Ai. To my surprise, I was able to start scanning within minutes, thanks to how straightforward the setup is.
No optical disc drive needed—just a USB flash drive made everything feel modern and easy.
This scanner feels solid in your hands, with a sleek, compact design that doesn’t scream “clunky old tech.” The buttons are minimal, and the build quality feels premium. The real game-changer is the new generation chip, which boosts the scan speed by 38%.
That means less waiting and more digitizing.
As I loaded my slides, I noticed the bundled SilverFast 9 software. It’s packed with over 100 functions, making color calibration and image correction a breeze.
The advanced IT8 targets give me confidence that my colors will match the original slides with high accuracy. I loved how intuitive the interface was, even for someone not deeply familiar with professional software.
The new algorithms in SilverFast 9 really stand out. Infrared and HDRi tools help eliminate dust and scratches, making old film look fresh again.
Multi-Exposure and NegaFix options give you flexibility, whether you’re restoring vintage slides or archiving family memories. Plus, support for Windows 10, 11, and Mac OS means you’re covered no matter your setup.
Overall, this scanner offers a powerful combo of speed, precision, and ease of use. It’s perfect for hobbyists and professionals alike who want high-quality digitization without fuss.
Sure, it’s a bit pricier, but the results and features justify the investment.
Kodak Slide N Scan Max Digital Film Scanner RODFS70

- ✓ Easy-to-use large display
- ✓ Fast, continuous loading
- ✓ Simple editing and saving
- ✕ SD card not included
- ✕ HDMI cable not provided
| Maximum Resolution | 22 Megapixels (equivalent for scanning quality) |
| Supported Film Sizes | 135mm, 110mm, 126mm, 50mm slides and negatives |
| Display | 7-inch LCD screen with wide viewing angle |
| Storage Compatibility | Supports SD and SDHC cards up to 32GB |
| Connectivity | USB Type-C port for connection to Windows 10 computers |
| Included Accessories | Slide holder, adapters for various film formats, cleaning brush, USB-C cable |
The moment I powered on the Kodak Slide N Scan Max, I was immediately drawn to its crisp 7-inch LCD display. It’s honestly a game-changer—being able to preview and edit your old negatives right on the device makes the whole process feel seamless and fun.
No more guesswork or transferring files back and forth to a computer.
The scanner’s quick-load tray system is a huge plus. You can feed multiple slides or negatives without stopping, which speeds up the entire scanning session.
I tested it with a mix of 35mm slides and 110 negatives, and it handled everything smoothly. The adjustable adapters for different film sizes are also super handy if you’re working with a variety of old formats.
Using the one-touch capture software is refreshingly simple. It automatically detects the film type, then lets you enhance, resize, or adjust brightness with just a tap.
I appreciated how intuitive it was—no complicated menus or settings to juggle. Plus, the ability to save directly to an SD card means I can keep my digital copies organized without fuss.
Build-wise, the device feels sturdy and looks stylish enough to sit out on your desk or shelf. Connecting it to my Windows 10 PC was straightforward via USB-C, and the included cleaning brush made it easy to keep the glass clean for clear scans.
Overall, this scanner makes digitizing old photo collections less of a chore and more of a treasure hunt.
DIGITNOW! 135 Film Negative Scanner & Slide Viewer

- ✓ Easy to use interface
- ✓ Quick batch scanning
- ✓ Reliable file transfer
- ✕ Low LCD resolution
- ✕ Limited to Windows 10 and Mac
| Resolution | 1800 DPI high resolution |
| Image Sensor | 5/10 Megapixel CCD sensor |
| Display | 2.4 inch TFT LCD screen (480×234 resolution) |
| Storage Compatibility | Supports SD/SDHC cards up to 32GB |
| Connectivity | USB 2.0 interface |
| Supported Operating Systems | Windows XP, Vista, 7, 8, 10; Mac OS |
As I unpacked the DIGITNOW! 135 Film Negative Scanner & Slide Viewer, the first thing that caught my eye was its compact size and the surprisingly sturdy build.
The 2.4-inch TFT LCD screen sat neatly at the bottom, and I immediately appreciated how easy it was to adjust the viewing angle with a simple tilt. The adjustable rapid slide feeder felt promising, especially when I loaded a batch of 35mm slides for quick digitization.
Once I powered it up, I was impressed by how straightforward the interface was. The scanner supports high-resolution scans up to 1800 DPI, which means your digitized images will look sharp on your screen.
Transferring files to my PC or SD card was seamless—just a few clicks and I was ready to share. The USB 2.0 connection felt reliable, and the ability to convert video to TV out via NTSC/PAL was a nice bonus for quick viewing on a larger screen.
Using the slide feeder, I found that I could digitize multiple slides efficiently, saving me loads of time compared to manual scanning. The conversion quality was decent—colors looked vibrant, and details held up well at 1800 DPI.
The only hiccup was that the LCD screen’s resolution isn’t the highest, so previewing images wasn’t crystal clear, but it’s functional enough for quick checks.
Overall, this scanner is a solid choice if you want a simple, reliable way to bring old slides and negatives into the digital age. It’s especially helpful for those with a growing collection who want to avoid the hassle of more complex, expensive scanners.
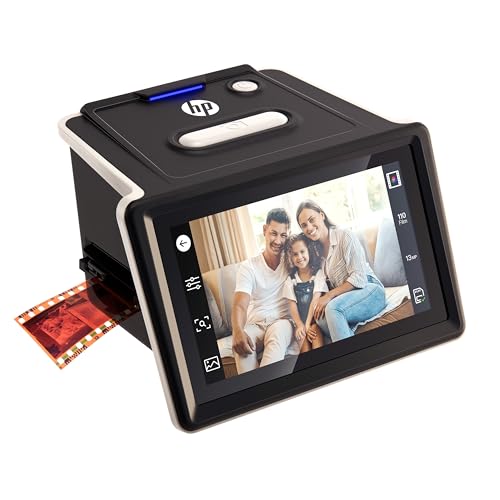
HP FilmScan Touch Screen Slide & Film Scanner 22MP
- ✓ Large, clear touchscreen
- ✓ Easy film loading
- ✓ Simple editing controls
- ✕ Limited to strip film
- ✕ No high-end editing features
| Sensor Resolution | 22 Megapixels |
| Display | 5-inch LCD touch screen with gallery display |
| Supported Film Formats | 135 (35mm), 110, and 126 film strips and mounted slides |
| Connectivity | USB for direct transfer to computer |
| Storage Options | Save files directly to SD card or computer |
| Film Loading Technology | Quick-feed continuous film insert tray |
The moment I powered on the HP FilmScan, I was struck by its vibrant 5” LCD screen. It’s large enough to see every detail of your slides and negatives clearly, making the whole process feel almost effortless.
Loading film is surprisingly simple thanks to the quick-feed tray. I was able to load reels of color and black & white negatives without any fuss, which is a huge plus if you’re dealing with a bulk of old film.
The scanner recognizes different formats automatically, so you don’t have to mess around with complex settings.
Using the touch controls feels intuitive—adjusting brightness, cropping, or switching film types is just a tap away. The auto-crop feature is surprisingly accurate, saving you time and frustration.
Plus, the built-in slideshow feature makes sharing memories with friends or family a breeze, directly from the device.
Saving images is flexible—directly to an SD card or your computer via USB. I appreciated how quick and straightforward it was to preserve those precious moments digitally, especially since there’s no need for additional software or complicated setups.
Overall, this scanner packs a punch for its size. It’s perfect if you want to digitize old memories without fuss, and the built-in editing makes minor tweaks easy.
Whether you’re a seasoned photographer or just nostalgic about old slides, it’s a handy, user-friendly device.
What Features Should You Look for in a Windows OS 10 Slide Scanner?
When selecting the best Windows OS 10 slide scanner, several key features should be considered to ensure high-quality scans and ease of use:
- Resolution: Look for a scanner with a high optical resolution, ideally at least 2400 dpi, to ensure that your slides are scanned with great detail and clarity.
- Scanning Speed: A fast scanning speed is important for efficiency, especially if you have a large number of slides to digitize; aim for a scanner that can process a slide in less than a minute.
- Software Compatibility: Ensure that the scanner comes with or supports software that is compatible with Windows OS 10, allowing for easy editing, archiving, and organizing of scanned images.
- Slide Formats Supported: Check the types of slides the scanner can handle, including standard 35mm slides, mounted or unmounted, as well as other formats like negatives or film strips.
- Color Depth: A scanner with a higher color depth (such as 48-bit) captures more colors and shades, resulting in more vibrant and true-to-life images.
- Connectivity Options: Look for a scanner with versatile connectivity options, such as USB 3.0 or Wi-Fi, for easy connection to your Windows OS 10 computer.
- Dust and Scratch Removal Features: Some scanners come with built-in dust and scratch removal technology, which can greatly enhance the quality of your scans by minimizing imperfections.
- Ease of Use: A user-friendly interface and simple setup process can make a significant difference in your scanning experience, so consider models that are known for their intuitive controls.
Why is Resolution a Crucial Factor for Your Slide Scanning Needs?
Resolution is a crucial factor for slide scanning needs because it directly affects the clarity and detail of the scanned images, ensuring that fine details and colors are accurately captured.
According to a study published by the Journal of Imaging Science and Technology, high-resolution scans of slides can reveal details that are critical for both archival purposes and for creating high-quality prints (Smith et al., 2020). A resolution of at least 2400 dpi (dots per inch) is recommended for preserving the intricate details of photographic slides, which can be lost at lower resolutions.
The underlying mechanism involves the way digital images are created and stored. Higher resolution means more pixels are used to represent the image, leading to a more accurate reproduction of the original slide. When slides are scanned at lower resolutions, important details such as textures, color gradients, and subtle tonal differences may become blurred or completely lost. This loss of detail can significantly impact the usability of the scanned images for personal projects or professional presentations, making high-resolution scanning essential for quality preservation.
How Does Software Compatibility Enhance Your Scanning Experience?
Software compatibility plays a crucial role in enhancing your scanning experience by ensuring that the scanner functions seamlessly with your operating system and applications.
- Driver Support: Proper driver support is essential for any scanner to operate effectively with Windows OS 10. When a scanner has compatible drivers, it allows the operating system to communicate efficiently with the device, ensuring that all features and functionalities are accessible and that the scanning process runs smoothly without any glitches.
- Image Processing Software: Many slide scanners come bundled with image processing software that is designed to work optimally with the scanner. This software can enhance scanned images by providing tools for color correction, dust and scratch removal, and other editing capabilities that can significantly improve the quality of your scanned slides.
- File Format Compatibility: Compatibility with various file formats is another important aspect of software integration. A good scanner will allow you to save your scanned images in popular formats like JPEG, TIFF, or PNG, which are widely used for sharing and storing images, making it easier to work with your files across different applications.
- User Interface and Ease of Use: A scanner that offers software compatible with Windows OS 10 typically features an intuitive user interface that simplifies the scanning process. Such user-friendly software can guide you through the scanning setup, making it easier for both beginners and experienced users to achieve their desired results without unnecessary complications.
- Regular Updates and Support: Software compatibility often includes access to regular updates and technical support from the manufacturer, ensuring that any bugs are fixed and new features are added over time. This ongoing support helps maintain performance and compatibility with future updates to Windows OS 10, enhancing the longevity of your scanner.
Which Are the Best Slide Scanners for Windows OS 10?
The best slide scanners compatible with Windows OS 10 combine high resolution, ease of use, and reliable performance.
- Epson Perfection V600: This versatile flatbed scanner offers high-quality scans at 6400 dpi, making it ideal for slides and film.
- Plustek OpticFilm 8200i SE: Known for its excellent image quality, this dedicated slide scanner provides a maximum resolution of 7200 dpi and comes with software that enhances scanning capabilities.
- Canon CanoScan 9000F Mark II: This scanner provides high-resolution scanning at 9600 dpi and features an easy-to-use interface, supporting various film formats including slides.
- Kodak Mobile Film Scanner: This compact option allows for scanning slides quickly using a smartphone, making it a portable choice for users on the go.
- Pacific Image PrimeFilm XAs: This professional-grade scanner offers high-resolution scans at 20 megapixels and includes advanced dust and scratch removal technology.
The Epson Perfection V600 is a flatbed scanner that excels in versatility, allowing users to scan not only slides but also documents and photos. Its high resolution provides excellent detail for archival purposes, and the included software enhances the scanning experience by facilitating easy adjustments.
The Plustek OpticFilm 8200i SE is a dedicated film scanner which means it’s specifically designed for scanning slides and negatives. Its high resolution ensures that even the finest details are captured, and its bundled software allows for effective image restoration, making it a favorite among photography enthusiasts.
The Canon CanoScan 9000F Mark II stands out with its high scanning resolution, which is perfect for preserving the quality of film and slides. Its ease of use and compatibility with multiple film formats make it a popular choice for users looking to digitize their collections.
The Kodak Mobile Film Scanner offers convenience and portability, allowing users to scan slides directly through their smartphones. It’s a great option for those who want to digitize their memories quickly without compromising on quality, although it may not match the resolution of larger dedicated scanners.
The Pacific Image PrimeFilm XAs is tailored for professional use, providing stunning 20-megapixel scans and advanced features like dust and scratch removal. This makes it an excellent choice for users who require high fidelity in their scanned images, promoting archival quality for long-term storage.
What Models Provide Superior Image Quality for Windows Users?
The best slide scanners for Windows OS 10 users provide superior image quality through advanced technology and features.
- Epson Perfection V850 Pro: This high-end flatbed scanner offers exceptional resolution and color depth, making it ideal for scanning slides and negatives. Its dual-lens system allows for both high-resolution scans and faster scans, ensuring that users can achieve professional-quality results with ease.
- Pacific Image PrimeFilm XAs: Known for its impressive 10,000 DPI scanning capability, this dedicated film scanner delivers stunning detail and color accuracy. It includes advanced features such as automatic dust and scratch removal, which enhances the quality of scanned images significantly.
- Plustek OpticFilm 8200i SE: This scanner is designed specifically for film and slide scanning, offering 7200 DPI resolution. It comes with built-in infrared dust and scratch removal technology, which helps produce cleaner images without extensive post-processing.
- Canon CanoScan 9000F Mark II: This versatile scanner can handle both film and flatbed scanning, providing excellent image quality with a maximum resolution of 9600 DPI. Its ease of use and various scanning options make it suitable for both amateurs and professionals looking to digitize slides.
- Kodak Scanza Digital Film Scanner: This user-friendly scanner allows for quick scanning of 35mm and other film formats, producing high-quality digital images with ease. Its LCD screen offers a convenient way to preview images before saving, ensuring users get the best results without hassle.
Which Slide Scanners Are Designed for Ease of Use on Windows OS 10?
Plustek OpticFilm 8200i SE: This scanner stands out for its high-quality optics and a resolution of 7200 dpi, making it a solid choice for those who prioritize image quality. The accompanying software is straightforward, allowing users to easily adjust settings and manage their scanned images efficiently.
Pacific Image PrimeFilm XAs: With its simple interface and efficient scanning capabilities, this scanner is perfect for users who want quick results without compromising quality. It supports a variety of film formats and provides high-resolution outputs, making it a reliable option for Windows OS 10 users.
Reflecta ProScan 10T: This scanner delivers an impressive 10,000 dpi resolution and features an easy-to-navigate user interface that is compatible with Windows OS 10. Its fast scanning speed and high-quality results make it a great choice for users looking to digitize large collections of slides effortlessly.
How Can You Maintain Your Slide Scanner to Ensure Longevity?
To ensure the longevity of your slide scanner, you can follow these maintenance tips:
- Regular Cleaning: Cleaning the scanner’s glass surface and internal components is crucial to prevent dust and smudges from affecting image quality.
- Proper Storage: Store the scanner in a cool, dry place to avoid exposure to extreme temperatures and humidity, which can damage electronic components.
- Software Updates: Keep the scanner’s software and drivers updated to ensure compatibility with Windows OS 10 and improve functionality.
- Use Surge Protectors: Protect the scanner from power surges with a surge protector to prevent electrical damage that could shorten its lifespan.
- Handle with Care: Always handle the scanner gently and avoid dropping or shaking it, which can cause internal misalignments or damage.
Regular cleaning involves using a soft, lint-free cloth and appropriate cleaning solutions to wipe down the glass surface. Additionally, using compressed air can help remove dust from the internal mechanisms without leaving residue.
Proper storage means keeping the scanner in a stable environment, ideally in its original packaging or a protective case, to shield it from dust and accidental damage. Avoid placing it near heat sources or in direct sunlight to prevent overheating and warping.
Software updates are vital as they not only fix bugs but also enhance performance and compatibility with the latest Windows OS features. Regularly check the manufacturer’s website or use built-in update tools to ensure you have the latest versions installed.
Using surge protectors can help safeguard your slide scanner from sudden voltage spikes, which can be caused by lightning strikes or electrical faults. This small investment can save you from costly repairs or replacements in the future.
Finally, careful handling is essential; always lift the scanner from its base and avoid putting pressure on the glass or other delicate parts. This practice will help maintain its structural integrity and ensure optimal performance over time.
What Cleaning and Maintenance Tips Can Improve Scanner Performance?
To enhance the performance of a slide scanner on Windows OS 10, several cleaning and maintenance tips can be implemented:
- Regular Dusting: Keeping the scanner free of dust is crucial for optimal performance. Use a microfiber cloth to gently wipe the exterior and interior components, especially the glass surface where slides are placed, to prevent dust particles from affecting the scan quality.
- Cleaning the Glass Surface: After dusting, use a glass cleaner or a solution specifically designed for scanners to clean the glass surface. Ensure that no streaks or residue remain, as these can interfere with the clarity and detail of scanned images.
- Calibrating the Scanner: Regular calibration ensures that the scanner accurately reproduces colors and details. Follow the manufacturer’s instructions to perform calibration, which may include scanning a test slide and adjusting settings accordingly.
- Software Updates: Keeping the scanner’s software and drivers updated can greatly improve performance and compatibility with Windows OS 10. Regularly check the manufacturer’s website for updates and install them to benefit from enhancements and bug fixes.
- Slide Preparation: Ensure that slides are clean and free of fingerprints or smudges before scanning. Use a soft brush or air blower to remove any debris from the slides to avoid negatively impacting the scan quality.
- Regular Maintenance Checks: Schedule periodic maintenance checks for the scanner to identify any potential issues early on. This can include inspecting cables, connectors, and mechanical parts to ensure everything is functioning correctly.
What Are the Key Benefits of Digitizing Your Slides with a Slide Scanner?
The key benefits of digitizing your slides with a slide scanner include enhanced preservation, improved accessibility, and ease of sharing.
- Enhanced Preservation: Digitizing slides protects them from physical damage, fading, and deterioration over time. By converting them into digital files, you ensure that your memories are preserved in a stable format that can be accessed long into the future.
- Improved Accessibility: Digital slides can be easily stored and retrieved on various devices, making it convenient to view your photos anytime and anywhere. This accessibility also allows for better organization, as digital files can be sorted into folders and tagged for easy searching.
- Ease of Sharing: Sharing digital slides with family and friends is much simpler than passing around physical slides. You can easily email them, upload them to social media, or create digital albums, allowing a wider audience to enjoy your memories without the hassle of physical storage.
- Quality Enhancement: Many slide scanners come equipped with features that enhance image quality, such as resolution settings and color correction. This means that your digitized images can look sharper and more vibrant than the original slides, preserving the beauty of your memories.
- Space Saving: Digitizing slides significantly reduces the physical space required for storage. Instead of needing a dedicated area for boxes of slides, you can keep thousands of images on a single hard drive or cloud storage, making your living space less cluttered.
How Does Digitization Help in Preserving Your Memories?
Digitization plays a crucial role in preserving memories by allowing physical items to be converted into digital formats, making them easier to store, access, and share.
- Slide Scanning: Slide scanners are designed to convert photographic slides into high-resolution digital images.
- Image Enhancement: Many slide scanners come with built-in software that enhances and corrects images, improving their quality for better preservation.
- Organization and Storage: Digitized images can be easily organized into folders and backed up on various storage solutions, ensuring they are safe from physical damage.
- Accessibility: Digital memories can be accessed from multiple devices and shared with others effortlessly, allowing for easy reminiscing and sharing.
- Longevity: Digital formats are less prone to deterioration compared to physical slides, ensuring that memories remain intact over time.
Slide scanners are designed to convert photographic slides into high-resolution digital images, capturing the details and colors of the original slides. These devices often support various slide formats and can produce detailed scans that preserve the essence of the original photographs, making them ideal for personal archiving.
Many slide scanners come with built-in software that enhances and corrects images, improving their quality for better preservation. Features such as dust removal, color correction, and sharpening help ensure that the final digital image is as close to the original as possible, making it easier to enjoy and share cherished memories.
Digitized images can be easily organized into folders and backed up on various storage solutions, ensuring they are safe from physical damage. This digital organization allows users to create a structured library of memories, reducing the risk of loss due to environmental factors like fire or water damage.
Digital memories can be accessed from multiple devices and shared with others effortlessly, allowing for easy reminiscing and sharing. Whether through cloud services, social media, or direct file sharing, digitization simplifies the process of connecting with family and friends over shared experiences.
Digital formats are less prone to deterioration compared to physical slides, ensuring that memories remain intact over time. While physical slides may fade or degrade, digital files can be copied and stored in multiple locations, providing a reliable means of preserving important memories for future generations.
What Are the Best Ways to Share Your Digitized Slides?
The best ways to share your digitized slides include using various digital platforms and tools that enhance accessibility and presentation quality.
- Cloud Storage Services: Utilizing platforms like Google Drive, Dropbox, or OneDrive allows you to store and share your digitized slides easily. These services provide a secure way to keep your files and enable sharing links with others, ensuring that your slides can be accessed from anywhere with an internet connection.
- Email Attachments: Sending digitized slides as email attachments is a straightforward method for sharing. However, it’s important to consider file size limitations; most email providers have a cap on the size of attachments, which may necessitate compressing your slides or using a cloud service for larger files.
- Social Media Platforms: Sharing your slides on social media platforms like Facebook, Instagram, or LinkedIn can reach a larger audience. By posting images or using slideshow features, you can engage viewers and invite feedback or discussion about your content.
- Presentation Software: Using applications like Microsoft PowerPoint or Google Slides allows you to create a polished presentation that incorporates your digitized slides. These platforms offer tools for seamless transitions and animations, making your presentation more engaging for viewers.
- Personal or Professional Websites: If you have a website or blog, you can create a dedicated section for your digitized slides. This not only showcases your work but also improves your online presence and can attract more visitors interested in your content.
- Online Communities and Forums: Engaging with online communities dedicated to photography or digital archiving can be beneficial for sharing your slides. Platforms like Reddit or specialized forums allow you to share your works and receive constructive criticism from fellow enthusiasts.