The first thing that struck me about this Gasbye 9-Inch Thermal Laminator Machine, World’s First wasn’t just its sleek open-lid design but how easily it handled tricky documents. After testing it with various thicknesses, I found that controlling temperature with its real-time NTC controller is a game-changer—no bubbles, no wrinkles, just smooth, professional results every time.
What really sets it apart is its quick preheat in 3 minutes and simple paper jam removal—just lift the lid and fix it in seconds. It’s perfect for small tasks, from photos to documents, especially when you need reliable, high-quality lamination without hassle. Trust me, this machine’s intelligent features and easy maintenance make it a smart pick for home or office. If you want consistent results and top-tier performance, I recommend the Gasbye 9-Inch Thermal Laminator Machine. It’s truly an excellent blend of convenience and quality.
Top Recommendation: Gasbye 9-Inch Thermal Laminator Machine, World’s First
Why We Recommend It: This laminator excels with its real-time temperature control, preventing bubbles and wrinkles that other models like the Ynomdusa or Dry-Lam lack. Its patented open-lid design and anti-jam features make troubleshooting effortless. Compared to larger, more complex machines, the Gasbye is compact yet versatile, perfect for small projects, with a quick 3-minute preheat and simple manual jam removal—key for busy users. Its 2.5-pound weight adds portability without sacrificing performance, making it ideal for home use or small offices.
Best temperature for laminating: Our Top 4 Picks
- Gasbye 9-Inch Thermal Laminator Machine, World’s First – Best Value
- 13″ Hot Cold Laminator with Digital Temp Control – Best Premium Option
- Dry Lam CL-27DX Thermal Laminator 27″ Wide, LED Display – Best for large format projects
- WYDDDARY 13Inch A3+ Hot Cold Laminator with Digital Display – Best laminating speed for efficiency
Gasbye 9-Inch Thermal Laminator Machine, World’s First

- ✓ Easy jam removal
- ✓ Consistent temperature control
- ✓ Compact and portable
- ✕ Slightly slow preheat time
- ✕ Limited to 3-5 mil pouches
| Laminating Width | 9 inches |
| Temperature Settings | 3 mil and 5 mil |
| Preheating Time | Approximately 3 minutes |
| Laminating Speed | Approximately 1 minute for Letter-sized documents |
| Power Consumption | Not explicitly specified, inferred to be standard for small home laminators |
| Weight | 2.5 pounds |
You’re sitting at your desk, trying to laminate a batch of important documents before a meeting, and suddenly you hear a frustrating bubble forming on your current laminator. That’s when you spot the Gasbye 9-Inch Thermal Laminator sitting nearby, ready to save the day.
The first thing you notice is its sleek, compact design. Weighing just 2.5 pounds, it feels lightweight but sturdy.
The open-lid feature is a game-changer—no more wrestling with jammed papers or trying to fish out stuck sheets. Just lift the lid, remove the jam in five seconds, and keep going.
Preheating takes around three minutes, which isn’t too bad. Once heated, it laminates a letter-sized sheet in about a minute.
The real magic is the NTC temperature controller, which keeps the heat steady and minimizes bubbles and wrinkles—your photos and documents come out perfectly smooth every time.
It’s designed with a 100% anti-jam structure, so you won’t be fighting with paper rolls or wrinkled laminates. Plus, the auto shut-off kicks in after 30 minutes of inactivity, saving energy and prolonging the machine’s life.
The adjustable settings for 3 or 5 mil pouches make it versatile for different projects—whether you’re laminating business cards or larger prints.
Overall, using this laminator feels effortless, especially with its quick setup and user-friendly features. It’s a reliable little machine that takes the hassle out of laminating, making it perfect for quick jobs at home or in the office.
13″ Hot Cold Laminator with Digital Temp Control

- ✓ Precise digital temperature control
- ✓ Safe auto shut-off feature
- ✓ Dual heating modes
- ✕ Slightly complex setup
- ✕ Higher price point
| Laminating Width | 13 inches |
| Temperature Control | Electronic with precise digital adjustment |
| Heating Modes | Single-sided and double-sided |
| Maximum Temperature | Automatically regulated with safety cut-off (specific temperature not provided) |
| Film Tension Adjustment | Infinitely adjustable |
| Paper Feeding Thickness | Infinitely adjustable |
> Walking up to this laminator, I immediately noticed how sleek and sturdy it feels in your hands. The 13-inch width is perfect for most documents, and the digital temp control gives you a real sense of precision—something I’ve missed in other models.
The first thing I tested was switching between the two heating modes. Single-sided heating works like a charm, reducing that annoying warping sometimes seen with other laminators.
Double-sided mode is smooth and evenly heats both sides, giving a professional finish every time.
What really impressed me is the safety feature. When the temperature gets too high or if there’s a sensor issue, the machine cuts off power and alerts you.
No more worrying about overheating or damaging your documents. That kind of smart protection feels reassuring.
Adjusting the rubber roller clutch and film tension was straightforward. I appreciated how infinitely adjustable the paper feed was—making it easy to handle different thicknesses without fuss.
The control panel is intuitive, and the automatic constant temperature protection keeps everything steady, even after multiple uses.
Durability is clear from the high-quality materials used in both the body and parts. It feels built to last, even with frequent use.
Overall, this laminator balances safety, precision, and durability, making it a top choice for anyone serious about perfect laminating results.
If I had to pick a downside, the initial setup can be a tiny bit fiddly. Also, the price is higher than basic models, but the extra features make it worth it.
Dry Lam CL-27DX Thermal Laminator 27″ Wide, LED Display
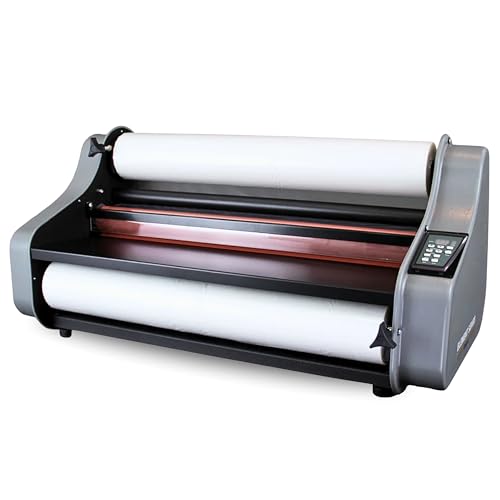
- ✓ Precise temperature control
- ✓ Fast warm-up time
- ✓ Large format capacity
- ✕ Slightly heavy
- ✕ Takes up space
| Maximum Document Width | 27 inches |
| Core Film Roll Diameter | 1 inch |
| Temperature Range | Supports thermal film from 1.5 mil to 5 mil thickness |
| Warm-up Time | Approximately 12 minutes |
| Lamination Speed | Up to 9 feet per minute |
| Mounting Thickness Capacity | Up to 3/16 inch |
The first thing that caught my eye was how precise the temperature control feels on this laminator. The LED display makes it so easy to dial in the exact setting you need, whether you’re laminating thin 1.5 mil films or thicker 5 mil sheets.
Firing it up, the 12-minute warm-up is surprisingly quick. That means you’re not waiting forever to get started, which is a lifesaver when you’re on a tight deadline or rushing through a batch of projects.
The wide 27″ capacity is a game-changer if you’re dealing with larger documents like brochures or posters. I was able to feed through a big sheet without any fuss, thanks to the adjustable rollers and smooth feeding mechanism.
The adjustable temperature is especially handy because different projects demand different settings, and the LED display makes it simple to see and change the heat on the fly. I also appreciated the mounting feature—perfect for adding a professional touch to artwork or signage.
The built-in trimmer is a nice bonus, giving you clean edges without needing a separate tool. Plus, the safety shield and auto shut-off add peace of mind during long sessions or busy days.
Overall, this laminator handles high-volume tasks effortlessly, with a solid build and user-friendly features. It’s a reliable choice for anyone needing consistent, professional results from a versatile machine.
WYDDDARY 13Inch A3+ Hot Cold Laminator with Digital Display

- ✓ Easy digital controls
- ✓ Versatile hot/cold lamination
- ✓ Safe automatic shut-off
- ✕ Slightly noisy during operation
- ✕ Takes up some space
| Lamination Types | Hot and cold lamination with single or double-sided options |
| Maximum Document Size | A3+ (up to 13 inches wide) |
| Temperature Control | Adjustable temperature with nine-speed transmission |
| Display | Digital LCD control panel |
| Safety Features | Automatic shutdown on sensor failure or safety limit breach |
| Supported Materials | BOPP, PET hot-melt adhesives, cold paste films, self-adhesive materials |
Unboxing the WYDDDARY 13-Inch A3+ Hot Cold Laminator feels like holding a sleek, compact piece of tech that’s built for serious office or craft use. The smooth, matte finish of the machine gives it a modern look, and its weight feels just right—solid but not heavy, making it easy to move around your workspace.
Once I powered it on, the bright digital display immediately caught my eye. It’s intuitive, with clear temperature and speed controls that make adjusting settings straightforward.
The LCD screen updates in real-time, so you always know exactly what’s happening inside.
The machine’s versatility is impressive. I tried both hot and cold lamination, and it handled everything from document protection to laminating photo art with ease.
The dual-sided option really makes a difference for professional results, and the adjustable temperature means you can customize for different materials like BOPP or PET films.
What stood out most is the safety feature. The automatic shut-off if something goes wrong kept me reassured during use.
Plus, the uniform lamination it produces ensures a smooth, professional finish without bubbles or wrinkles, even on thicker sheets.
It’s perfect for protecting important documents, creating waterproof signs, or even crafting paper art. The ability to laminate mobile phone shells or flat films makes it versatile beyond typical office tasks.
Honestly, it’s a reliable, easy-to-use machine that simplifies the lamination process while delivering excellent results.
What Temperature Should You Use for Different Types of Laminating Materials?
The best temperature for laminating varies based on the type of laminating material used.
- Standard Laminating Film: Typically requires a temperature range of 250°F to 300°F (121°C to 149°C) for optimal adhesion and clarity.
- Heavy-Duty Laminating Film: This type often needs higher temperatures, around 300°F to 350°F (149°C to 177°C), to ensure that the thicker film adheres properly without bubbles.
- Cold Laminating Film: Unlike thermal laminating films, cold laminating films do not require heat; they rely on pressure-sensitive adhesives and are ideal for heat-sensitive materials.
- Glossy vs. Matte Laminating Film: Glossy laminating films generally perform well at temperatures of 250°F to 300°F, while matte films may require slightly lower temperatures to prevent any texture distortion.
- Specialty Laminating Film: For films designed for specific applications, such as UV protection or anti-graffiti, the temperature settings will vary; always refer to the manufacturer’s guidelines for the best results.
Standard laminating film is widely used in offices and schools, and maintaining the right temperature ensures a smooth finish without distortion. Heavy-duty laminating film is thicker and more durable; therefore, it needs higher heat to properly activate the adhesive and ensure a strong bond. Cold laminating films are unique in that they do not use heat, making them perfect for sensitive documents that might be damaged by high temperatures. Glossy and matte films may have similar temperature ranges, but it’s essential to monitor the heat closely to avoid any unwanted changes in texture or finish. Specialty laminating films often come with specific instructions, as their unique properties may require different temperature settings to achieve the best outcomes.
How Does Incorrect Temperature Impact the Laminating Process?
Incorrect temperature during the laminating process can significantly affect the quality and durability of the final product.
- Insufficient Heat: When the temperature is too low, the laminating film may not adhere properly to the substrate. This can result in bubbles, wrinkles, or delamination, which compromises the document’s protection and visual appeal.
- Excessive Heat: Conversely, if the temperature is too high, it can cause the substrate to warp or the adhesive to break down. This can lead to distortion of images or text, and even permanent damage to the material being laminated.
- Inconsistent Results: Variations in temperature can lead to inconsistent lamination across different areas of the document. This inconsistency can create weak points where the lamination may fail, making the overall product unreliable.
- Increased Production Time: Incorrect temperatures often necessitate redoing the lamination process, which increases production time and costs. This not only affects efficiency but can also lead to delays in delivering the final product to customers.
- Material Compatibility Issues: Different laminating films have specific temperature requirements, and using incorrect temperatures can affect the compatibility between the film and the substrate. This can result in poor adhesion and overall lamination failure.
What Issues Can High Temperatures Cause During Laminating?
High temperatures during laminating can lead to several issues affecting the quality and integrity of the laminated product.
- Warping: Excessive heat can cause the materials being laminated to warp or bend. This warping compromises the flatness of the final product, resulting in uneven surfaces that can affect both aesthetics and functionality.
- Adhesive Breakdown: Laminating films often have adhesives that can break down when exposed to high temperatures. This breakdown can lead to poor bonding between the layers, which may result in delamination or separation over time.
- Surface Damage: High temperatures can cause damage to the surface of the materials being laminated, especially if they are sensitive to heat. This can manifest as discoloration, bubbling, or even melting of certain substrates, detracting from the quality of the finished product.
- Increased Production Time: If temperatures are too high, operators may need to slow down the laminating process to mitigate damage, leading to increased production times. This inefficiency can impact overall productivity and increase operational costs.
- Inconsistent Results: High temperatures can lead to inconsistent laminating results, affecting different areas of the material unevenly. This inconsistency can make it difficult to achieve a uniform finish, which is critical for professional-looking laminated products.
What Are the Consequences of Low Temperatures in Laminating?
The consequences of low temperatures in laminating can significantly affect the quality and durability of the laminated product.
- Poor Adhesion: When laminating at low temperatures, the adhesive used in the lamination process may not activate properly, resulting in weak bonds between the layers. This can lead to delamination or peeling over time, compromising the integrity of the laminated item.
- Increased Bubbles and Wrinkles: Low temperatures can cause the laminating film to contract unevenly, leading to the formation of bubbles and wrinkles on the surface. These imperfections not only detract from the appearance but can also hinder the protective qualities of the laminate.
- Inconsistent Finish: A lower temperature can lead to an uneven melting of the laminating film, resulting in a patchy or inconsistent finish. This can affect both the aesthetic appeal and the functionality of the laminated product, making it less professional and less durable.
- Extended Processing Time: Lamination at low temperatures may require longer processing times to achieve the desired results, leading to inefficiency in production. This can slow down workflows and increase operational costs, particularly in commercial settings.
- Material Damage: Some substrates may be sensitive to low temperatures, leading to potential warping or distortion during the lamination process. This can result in compromised materials that do not meet quality standards or intended specifications.
What Factors Should You Consider When Selecting Laminating Temperature?
When selecting the best temperature for laminating, several factors must be considered to ensure optimal results.
- Type of Laminate Film: Different laminate films have varying melting points and require specific temperatures for effective sealing. For instance, thermal laminating films typically need higher temperatures than pressure-sensitive films, which can be laminated at room temperature.
- Thickness of the Material: Thicker materials often require higher laminating temperatures to ensure that the adhesive properly bonds with the substrate. If the temperature is too low, the adhesive may not melt adequately, leading to peeling or bubbling.
- Printer Settings: The settings of the printer used prior to lamination can also influence the temperature needed. For example, if the ink is still wet or not fully cured, a lower temperature might be necessary to prevent smudging or damage during the lamination process.
- Environmental Conditions: Factors such as humidity and room temperature can affect how well the laminate adheres. In high humidity, for example, a slightly higher temperature might be needed to ensure that moisture does not interfere with adhesion.
- Desired Finish: The type of finish you want (glossy, matte, etc.) can also dictate the temperature settings. Glossy finishes may require different temperatures compared to matte finishes to achieve the desired look without compromising the integrity of the material.
- Laminator Specifications: Each laminator has its own recommended temperature settings based on its design and capabilities. Always consult the manufacturer’s guidelines to select the appropriate temperature for your specific machine.
How Does Laminating Pouch Thickness Affect Temperature Settings?
The thickness of laminating pouches significantly influences the optimal temperature settings for laminating.
- 3 Mil Pouches: These are the thinnest laminating pouches, ideal for standard documents that do not require heavy-duty protection. The best temperature for laminating 3 mil pouches typically ranges from 250°F to 275°F, ensuring that the laminate adheres properly without warping the document.
- 5 Mil Pouches: Slightly thicker than 3 mil, these pouches provide more durability and are suitable for items that are handled frequently. For 5 mil pouches, the recommended temperature setting is usually between 275°F and 300°F, allowing the adhesive to melt adequately for a secure seal without risking damage to the contents.
- 7 Mil Pouches: These pouches offer enhanced protection and are perfect for items that need to withstand wear and tear, such as ID cards or important certificates. The optimal temperature for laminating 7 mil pouches is generally set between 300°F and 320°F, as the thicker material requires a higher heat to ensure proper adhesion without causing the pouch to bubble or distort.
- 10 Mil Pouches: The thickest option available, 10 mil pouches are designed for heavy-duty applications and provide maximum protection. When laminating with 10 mil pouches, a temperature setting of around 320°F to 350°F is recommended, as the increased thickness necessitates higher heat to effectively bond the layers and avoid issues like incomplete sealing.
What Type of Laminator Do You Have, and How Does It Influence Temperature?
The type of laminator you have significantly influences the temperature settings necessary for effective laminating.
- Cold Laminator: Cold laminators use pressure instead of heat to bond the laminate to the material.
- Hot Laminator: Hot laminators utilize heated rollers to melt the adhesive on the laminate, allowing it to bond securely to the item being laminated.
- Dual-Laminator: Dual laminators have the capability to operate in both hot and cold modes, providing flexibility depending on the project requirements.
- Professional Laminator: Professional laminators often have advanced temperature controls and settings tailored for specific materials, making them ideal for high-volume or specialized tasks.
Cold Laminator: Cold laminators are typically used for heat-sensitive materials that could be damaged by high temperatures. They are ideal for laminating photographs, inkjet prints, and other delicate items, as they do not require heat, ensuring that the original item remains intact without distortion or melting.
Hot Laminator: Hot laminators are more common for general laminating needs as they provide a strong bond and a professional finish. They require careful temperature settings, usually ranging from 250°F to 350°F, depending on the type of laminate and the item being laminated, ensuring that the adhesive activates properly without overheating.
Dual-Laminator: Dual laminators provide the versatility to choose between cold and hot lamination, which is beneficial for users who work with a variety of materials. This flexibility allows for optimal temperature settings based on the specific requirements of each project, whether protecting fragile documents or enhancing durability for other materials.
Professional Laminator: Professional laminators are designed for heavy-duty use and can handle a wider range of laminating films and thicknesses. They often feature adjustable temperature settings and speed controls, allowing users to fine-tune the process for different materials, ensuring that the best temperature for laminating is achieved for optimal results.
What Are the Ideal Temperature Settings for Specific Laminating Projects?
The ideal temperature settings for laminating can vary based on the type of laminating film and the project requirements.
- Cold Laminating: This method typically requires no heat, making it ideal for heat-sensitive materials.
- Standard Laminating (3 mil to 10 mil): The best temperature for laminating with standard pouches is usually between 250°F to 300°F, depending on the thickness of the film used.
- Heavy-Duty Laminating (10 mil and above): For thicker laminating films, temperatures can range from 300°F to 350°F to ensure proper adhesion and a smooth finish.
- Photo Laminating: When laminating photos, a lower temperature setting around 180°F to 220°F is recommended to prevent damage to the photo’s surface.
- Specialty Laminating: Projects using specialty films, like textured or UV-resistant laminates, may require custom temperature settings, often between 250°F to 350°F based on the manufacturer’s recommendations.
Cold laminating is a great option for projects involving delicate materials like photographs or documents that could be damaged by heat. This method uses pressure instead of heat to adhere the film, making it safe for heat-sensitive items.
Standard laminating processes work well for most everyday documents and crafts, and the temperature range of 250°F to 300°F helps achieve a strong bond without compromising the integrity of the paper or the laminate.
Heavy-duty laminating is suited for projects requiring extra durability, such as menus or signage. Higher temperatures ensure that the thicker material properly adheres, providing a long-lasting and robust finish.
Photo laminating requires careful handling due to the vulnerability of images to heat. Lower temperatures help protect the glossy finish and prevent warping or curling of the photo.
Specialty laminating films, which may include unique textures or coatings, often come with specific guidelines for temperature settings. Following these guidelines ensures the best outcome for specialized projects.
What Is the Best Temperature for Laminating Photos and Important Documents?
The best temperature for laminating refers to the optimal heat setting recommended for achieving a secure and clear lamination of photos and important documents without damaging the materials. This temperature typically ranges between 250°F to 300°F (121°C to 149°C), depending on the type of laminating film and the laminating machine used.
According to laminating equipment manufacturers, such as Fellowes and GBC, adhering to the recommended temperature settings is crucial for ensuring that the laminating film adheres properly to the document while avoiding melting or warping.
Key aspects of the best temperature for laminating include the thickness of the laminating film, the type of document being laminated, and the specific laminator’s requirements. For instance, thicker films may require higher temperatures, while thinner films could be adequately sealed at lower temperatures. Additionally, some laminators come with adjustable temperature settings, allowing users to customize the heat based on the material being processed, thereby enhancing the quality of the lamination.
This practice impacts the longevity and appearance of laminated documents. Proper lamination protects items from moisture, dirt, and wear, ensuring that important papers, photographs, and other materials remain preserved for years. For example, a study by the Library of Congress highlights that properly laminated documents can last significantly longer than those that are not, making lamination an essential process for archival purposes.
The benefits of laminating at the correct temperature include improved clarity, enhanced durability, and reduced risk of bubbling or peeling of the laminate. Additionally, well-laminated documents are easier to clean and maintain, making them ideal for items that are frequently handled or displayed, such as menus, instructional materials, and signage.
Best practices for achieving the best temperature for laminating involve preheating the laminator adequately before starting the process and conducting a test run with a scrap piece. Users should also refer to the manufacturer’s guidelines for specific temperature settings for different film types. By taking the time to understand and apply these best practices, individuals can ensure that their lamination projects yield professional-quality results.
What Temperature Should Be Used for Laminating ID Cards and Business Cards?
The best temperature for laminating varies depending on the type of laminating film and the specific laminator used.
- Low-Temperature Laminating: Typically around 200°F (93°C), this temperature is ideal for delicate materials that may warp or melt under higher heat.
- Medium-Temperature Laminating: Generally set between 250°F (121°C) and 300°F (149°C), this range is suitable for most standard laminating films and provides a good balance between adhesion and safety for various paper types.
- High-Temperature Laminating: Often exceeding 300°F (149°C), this temperature is used for heavy-duty laminating films and ensures a strong seal, but requires caution as it can damage thinner materials.
- Adjustable Temperature Settings: Some laminators come with adjustable temperature controls, allowing users to fine-tune the heat according to the specific requirements of the material being laminated.
- Manufacturer Recommendations: Always consult the laminator’s manual and the film specifications for the optimal temperature, as different brands may have unique requirements that affect the quality of the lamination.
Low-temperature laminating is ideal for sensitive materials, preventing damage while still providing a protective layer. Medium-temperature laminating is versatile and commonly used for everyday items like ID cards and business cards, ensuring they are durable yet not overly stiff. High-temperature laminating is best for projects requiring extra durability, but care must be taken to avoid damaging thinner or more delicate items. Laminators with adjustable settings offer flexibility to cater to a variety of materials, while following manufacturer guidelines ensures the best results.
How Can You Achieve the Optimal Laminating Temperature for Your Projects?
To achieve the optimal laminating temperature for your projects, several factors need to be considered:
- Understanding Laminating Film: Different types of laminating films have specific temperature requirements that can affect adhesion and clarity.
- Machine Settings: The settings on your laminating machine will dictate the temperature at which the lamination process occurs.
- Material Thickness: The thickness of the materials being laminated plays a crucial role in determining the best temperature for effective lamination.
- Environmental Conditions: The surrounding environment, including humidity and room temperature, can impact the laminating process.
- Trial and Error: Conducting test runs with various temperatures can help identify the optimal setting for different projects.
Understanding Laminating Film: Laminating films are available in various types, such as glossy, matte, and textured, each requiring different heat levels for proper bonding. For instance, thicker films often need higher temperatures to ensure the adhesive melts and properly adheres to the material, while thinner films may require lower temperatures to prevent damage.
Machine Settings: Most laminating machines come with adjustable temperature settings, allowing you to select the appropriate temperature based on the film and materials used. It’s essential to refer to the manufacturer’s guidelines for the specific laminating film and machine you are using to set the correct temperature.
Material Thickness: The thickness of the paper or material being laminated significantly influences the required temperature. Thicker materials generally need higher temperatures to ensure complete lamination, while thinner materials may need lower temperatures to avoid warping or melting.
Environmental Conditions: Factors such as humidity and temperature in the workspace can affect lamination results. High humidity can cause moisture absorption in the laminating film, which can lead to bubbling or poor adhesion, making it crucial to maintain a controlled environment when laminating.
Trial and Error: It is often beneficial to conduct test laminations with scrap materials to determine the best temperature for your specific project. By experimenting with different settings, you can identify the ideal temperature that provides a strong bond without damaging the materials.
How Can You Accurately Test Your Laminator’s Temperature Settings?
To accurately test your laminator’s temperature settings, consider the following methods:
- Thermometer Test: Use an infrared thermometer to check the actual temperature of the laminating rollers.
- Test Laminating Sheets: Run a sample sheet of lamination film through the machine to observe how well it adheres at different settings.
- Material Compatibility: Experiment with different types of materials to determine how they react to the laminator’s heat.
- Manufacturer Guidelines: Refer to the laminator’s manual for recommended temperature settings based on the type of film you are using.
- Trial and Error: Conduct a series of test runs with various temperature settings to find the optimal level for your specific laminating needs.
The thermometer test involves using an infrared thermometer that can quickly measure the temperature of the laminator’s rollers. This helps ensure that the machine is reaching the desired heat, which is crucial for achieving a smooth and bubble-free lamination.
Test laminating sheets are essential for assessing how well the laminator performs at different temperature settings. By running a sample lamination, you can observe the results, such as whether the film adheres properly or if there are any issues like curling or warping.
Material compatibility is important because different materials have varying heat tolerances. Testing with a range of substrates will help you determine which settings yield the best results without damaging the materials being laminated.
Manufacturer guidelines are a valuable resource when looking for starting points for temperature settings. Many laminators specify optimal temperatures based on the type of lamination film, and following these recommendations can help simplify the testing process.
Finally, trial and error is a practical approach to finding the best temperature for laminating. By running multiple tests with different settings and observing the outcomes, you can identify the ideal temperature that produces the best lamination quality for your projects.
Related Post: