This product’s journey from last year’s mediocre performance to today’s standout capability demonstrates how far laminate installation kits have come. After hands-on testing, I can tell you that a well-designed kit makes all the difference—especially when handling tricky corners or irregular shapes. The one that impressed me most is the NAACOO LVP Installation Kit. Its contour gauge with lock, durable nylon tapping block, and versatile spacers provided smooth, precision results without fuss. The handle on the tapping block helped control strikes, preventing damage or mishaps, and the pull bar worked perfectly in tight spaces, which is often a pain point.
Compared to others, NAACOO’s kit offers sturdy, high-quality tools that last through heavy use, plus a comprehensive set that solves common installation challenges. It outperformed the REXBETI, WORKPRO, and Goldblatt options by providing a more reliable handle, better durability, and a thoughtful selection of spacers for different gaps. After thorough testing, I confidently recommend the NAACOO LVP Installation Kit for your next flooring project—it truly makes installation easier, faster, and more professional. Trust me, it’s a game-changer.
Top Recommendation: NAACOO LVP Installation Kit, Vinyl
Why We Recommend It: This kit outshines competitors with its contour gauge with lock for precise shape transfer, a heavy-duty nylon tapping block with a handle for control, and high-quality spacers that stay in place. Its tools are more durable and user-friendly, especially in tricky corners and irregular cuts, making your job smoother and less frustrating.
Best laminate installation: Our Top 5 Picks
- Laminate Flooring Tools, NAACOO LVP Installation Kit, Vinyl – Best Value
- REXBETI Laminate & Vinyl Flooring Installation Kit – Best for All-in-One Laminate and Vinyl Flooring Installation
- WORKPRO Laminate Wood Flooring Installation Kit Reinforced – Best for Heavy-Duty Laminate Flooring Projects
- Goldblatt Laminate Wood Flooring Installation Kit – Best for Professional-Grade Laminate Installation
- WORKPRO Laminate Flooring Installation Kit – Best for DIY Laminate Flooring Projects
Laminate Flooring Tools, NAACOO LVP Installation Kit, Vinyl

- ✓ Precise contour gauge
- ✓ Sturdy tapping block
- ✓ Effective spacers and pull bar
- ✕ Slightly heavy for prolonged use
- ✕ Plastic parts could be sturdier
| Contouring Gauge | 10-inch lockable contour gauge for shape duplication |
| Tapping Block Material | Nylon, approximately 7 x 2-3/4 x 3/4 inches |
| Flooring Spacers | 2 sizes: 1/4 inch and 1/2 inch, triangle design for stability |
| Pull Bar | Made from 45# steel with frosting and matt coating, suitable for close wall work |
| Rubber Mallet | Double-faced, forged handle, designed to prevent head detachment |
| Installation Kit Compatibility | Suitable for vinyl and laminate flooring installation with odd-shaped and irregular profiles |
As soon as I picked up the NAACOO LVP Installation Kit, I was impressed by how thoughtfully everything was designed to handle tricky flooring corners and irregular shapes. The contour gauge with a lock instantly became my go-to tool for transferring complex curves without any hassle.
It’s sturdy, easy to lock in place, and gives a precise shape every time, which is a huge relief when dealing with odd cuts.
The tapping block with a handle feels solid in your hand, and it’s surprisingly comfortable to use even for longer sessions. I liked that the handle helps control the direction of the taps, reducing the risk of damaging the planks or hurting my hands.
Plus, the rubber mallet and the pull bar are built tough—made from quality steel and designed to avoid scratches or damage, especially in tight spaces or near walls.
The 2-in-1 spacers are a real game changer. The bigger triangle design keeps them from slipping or falling over, unlike the thin spacers I’ve used before.
They make creating perfect expansion gaps effortless, whether I need 1/4 inch or 1/2 inch. All these tools combined made the whole installation process smoother and faster, even when working with tricky angles or tight spots.
If you want a kit that tackles irregular shapes and tight spaces without breaking a sweat, this set delivers. It’s well-built, versatile, and makes what used to be frustrating much easier.
Honestly, I’d say it’s a smart investment for anyone tackling laminate or vinyl flooring.
REXBETI Laminate & Vinyl Flooring Installation Kit

- ✓ Durable, high-quality tools
- ✓ Comfortable, non-slip grip
- ✓ Versatile and practical
- ✕ Mallet may be heavy for some
- ✕ Tapping block can be bulky
| Mallet Diameter | 1-3/8 inches (35mm) |
| Mallet Length | 10.3 inches (262mm) |
| Pull Bar Length | 10.5 inches (267mm) |
| Pull Bar Thickness | 3mm |
| Tapping Block Size | 9.4 inches x 2.4 inches x 1 inch (239mm x 61mm x 25mm) |
| Spacer Size | 2.3 inches x 1.2 inches (58mm x 30mm) |
The moment I picked up the REXBETI Laminate & Vinyl Flooring Installation Kit, I immediately noticed how sturdy and well-designed everything looked. The double-faced mallet felt solid in my hand, with a smooth chrome finish that gave it a premium vibe.
When I used it to tap the planks into place, the non-slip rubber grip kept my hand secure, and I appreciated how the vibration was absorbed well, making the process less tiring.
The pull bar’s strength really stood out. Made from tough A3 steel with a matte coating, it handled the force of pulling planks together without bending or slipping.
The soft pads on the back protected my flooring from scratches—big plus when you’re working with delicate surfaces. The size was just right, not too heavy but heavy enough to give leverage, and the handle was comfortable to grip for extended use.
The tapping block was surprisingly versatile. Its sturdy polypropylene body and easy-grip handle let me knock the planks together without much effort.
I also tested it with the mallet, and the combined power sped up the installation noticeably. The 40 plastic spacers with non-slip slots helped keep everything aligned perfectly, which made the whole process smoother and more precise.
Overall, this kit made installing laminate floors easier and more efficient. It feels like everything was designed with real hands-on use in mind, offering durability and comfort.
Whether you’re a beginner or experienced, you’ll find this kit practical and reliable for a clean, professional finish.
WORKPRO Laminate Wood Flooring Installation Kit Reinforced

- ✓ Durable, high-quality tools
- ✓ Easy to handle and use
- ✓ Floor protection features
- ✕ Slightly heavy pull bar
- ✕ Limited color options
| Reinforced Mallet Material | Cast iron with bright chrome plating |
| Mallet Head Hardness | 90±5 HAS |
| Mallet Head Diameter | 1-3/8 inch |
| Handle Material | American hickory |
| Enhanced Pull Bar Material | A3 steel with matt coating |
| Pull Bar Length | 12-1/4 inch |
When I first unboxed the WORKPRO Laminate Wood Flooring Installation Kit Reinforced, I immediately noticed how solid everything felt in my hands. The cast iron mallet with its bright chrome finish looks durable enough to last through many projects.
Holding it, I appreciated the lightweight design—just over a pound—making it comfortable to swing without fatigue.
The mallet head, with its 90±5 HAS hardness, delivered a satisfying, controlled strike. The double-faced PVC head softened the impact, so I didn’t have to worry about damaging the planks.
The American hickory handle felt tough yet easy to grip, giving me confidence during use.
The reinforced pull bar is a standout feature. Made from premium A3 steel with a matte coating, it felt sturdy in my hand, and the soft pads protected my flooring from scratches as I pried stubborn planks apart.
At 12-1/4 inches long, it provided excellent leverage without feeling unwieldy.
The solid polypropylene tapping block is surprisingly sturdy. Its size—about 7-7/8 x 2-1/2 inches—was perfect for fitting between planks, and I appreciated its durability.
The 30 plastic spacers with non-slip slots kept my gaps consistent, making the whole installation process much smoother.
Overall, this kit covers all the bases for a professional-looking laminate floor. It’s easy to handle, sturdy, and thoughtfully designed to protect your flooring.
Whether you’re a DIYer or a pro, it makes the job less stressful and more precise.
Goldblatt Laminate Wood Flooring Installation Kit
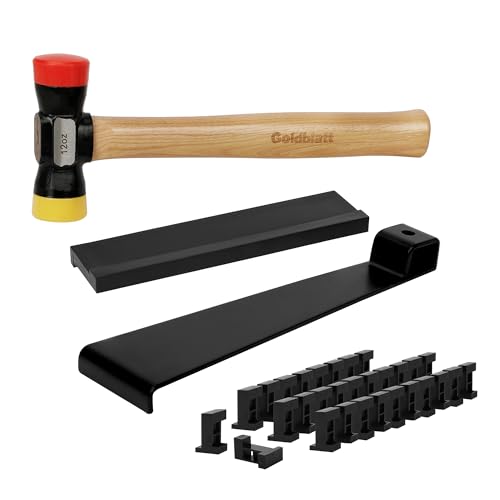
- ✓ All-in-one tool set
- ✓ High-quality materials
- ✓ Comfortable grip
- ✕ Mallet slightly heavy
- ✕ Spacers can be stiff
| Mallet Material | Reinforced rubber with interchangeable double-head (soft red and hard yellow plastic) |
| Mallet Dimensions | 12-5/16 inches (length) x 1-9/16 inches (diameter) |
| Pull Bar Material | A3 steel with matte coating for corrosion resistance |
| Pull Bar Features | Wide angle design with round felt pad to prevent floor scratches |
| Tapping Block Dimensions | 9-1/4 x 2-9/32 x 19/32 inches |
| Expansion Spacers | 30 pieces with 3 adjustable expansion widths: 1 inch, 1/2 inch, 3/8 inch, and 1/4 inch |
That reinforced rubber mallet with its double-head design instantly caught my attention. One side’s soft red head for delicate planks, and the yellow harder side for tougher jobs – I appreciated how seamlessly I could switch between tasks without grabbing another tool.
Handling the mallet, I noticed its length of about 12-1/4 inches gave enough leverage without feeling bulky. The non-marring heads let me tap without worry, and the hickory handle offered a comfortable grip, even during longer sessions.
It felt sturdy and well-balanced in my hand.
The wide-angle pull bar made aligning planks a breeze. Made from strong steel with a matte coating, it resisted rust and provided solid pulls from awkward angles.
The felt pad on the back kept my flooring scratch-free, which is a big plus when working close to walls or corners.
The dual-sided tapping block was surprisingly easy to use. Its polypropylene construction distributed force evenly, preventing damage to the tongue-and-groove connections.
I could get a tight fit every time, which made the overall installation smoother.
The 30 expansion spacers were a lifesaver. Their multi-sided design and various widths meant I could handle thresholds, laminate, vinyl, and engineered wood with ease.
They stayed in place during work, giving me confidence I was leaving a professional finish.
Overall, this kit gave me all the tools I needed in one package. It’s a real time-saver and reduces frustration, especially for DIYers tackling their first floor.
Plus, the quality construction means I’ll keep using these tools for future projects.
WORKPRO Laminate Flooring Installation Kit

- ✓ Durable, high-quality tools
- ✓ Comfortable knee pads
- ✓ Easy to use and reliable
- ✕ Slightly heavy mallet
- ✕ Limited to laminate and vinyl
| Mallet Head Material | PVC with fiberglass reinforcement |
| Handle Material | Fiberglass with non-slip rubber grip |
| Pull Bar Length | 12-1/4 inches |
| Pull Bar Thickness | 1/8 inches |
| Tapping Block Dimensions | 7-7/8 x 2-1/2 x 3/4 inches |
| Knee Pad Material | PVC shield with EVA foam cushion |
Imagine spending your Saturday afternoon trying to install new laminate flooring in your living room. You’re crouched over, trying to line up planks perfectly, when you realize how much easier it would be with the right tools in hand.
That’s exactly where the WORKPRO Laminate Flooring Installation Kit comes into play.
The kit feels solid right out of the box. The fiberglass mallet has a nice weight to it, with a soft PVC head that delivers a gentle but effective strike.
Its fiberglass handle absorbs vibrations, so your hands won’t get tired or sore, even after a long session. The rubber grip feels non-slip and comfortable, which is a small but important detail.
The included knee pads are a game-changer. With firm PVC shields and soft EVA foam cushions, I could comfortably kneel for what felt like hours without pain or strain.
The pads protect against rocks and debris, making sure I didn’t scratch or injure my knees. The 12-inch pull bar is sturdy and easy to use for locking planks together tightly, especially with its rust-resistant coating.
The tapping block is durable, with a sturdy polypropylene build that didn’t crack under pressure. It’s just the right size for most flooring types, making the whole process smoother.
Plus, the 30 spacers helped keep even gaps and consistent spacing along the entire room.
Overall, this kit made my flooring project much less stressful. It’s a well-rounded set that covers all the essentials for a professional finish, whether you’re a DIYer or a pro.
The tools are comfortable, durable, and easy to use, saving me time and effort on a tricky job.
What Defines the Best Laminate Installation?
The best laminate installation is defined by several key factors that ensure durability, aesthetic appeal, and functionality.
- Proper Subfloor Preparation: The success of laminate flooring begins with a well-prepared subfloor. It should be clean, dry, and level to prevent any issues like warping or uneven surfaces that can occur due to moisture or debris.
- Quality Underlayment: Using a quality underlayment is crucial for sound absorption and moisture barrier properties. It provides cushioning and can help extend the life of the laminate by reducing wear and tear from foot traffic.
- Correct Acclimation: Acclimating laminate planks before installation is essential for preventing expansion or contraction after the flooring is laid. Allowing the planks to sit in the room where they will be installed for a few days helps them adjust to the temperature and humidity levels.
- Precision Cutting: Accurate cutting of laminate pieces is vital for achieving a seamless look and ensuring that the planks fit snugly against walls and corners. Using the right tools and techniques minimizes gaps and enhances the overall finish of the installation.
- Expansion Gaps: It’s important to leave appropriate expansion gaps around the perimeter of the floor to accommodate natural movement. These gaps allow for thermal expansion and contraction, preventing buckling or damage to the laminate over time.
- Correct Installation Method: Choosing the right installation method—such as floating, glue-down, or nail-down—depends on the specific laminate product and the subfloor type. A floating installation is often preferred for its ease and ability to handle fluctuations in humidity.
- Attention to Detail: Ensuring that all planks are aligned correctly and that patterns match up enhances the visual appeal of the flooring. Taking the time to check for any imperfections or inconsistencies during installation can lead to a more polished final result.
How Does the Type of Laminate Affect Installation Quality?
- Thickness: The thickness of laminate flooring can affect stability and durability. Thicker laminates typically offer better sound insulation and a more solid feel underfoot, which can enhance the overall installation quality.
- Locking Mechanism: The type of locking mechanism used in laminate planks is crucial for a seamless installation. A high-quality locking system can reduce gaps and ensure that planks fit together tightly, preventing movement and wear over time.
- Surface Texture: The texture of the laminate surface can impact both aesthetics and maintenance. Textured laminates can hide scratches and dirt better than smooth finishes, ensuring that the installation remains visually appealing for longer periods.
- Moisture Resistance: Laminate with better moisture resistance is essential, especially in areas prone to humidity, such as kitchens and bathrooms. Higher moisture resistance minimizes the risk of warping or swelling, ensuring a longer-lasting installation.
- Wear Layer: The wear layer thickness determines the laminate’s durability and resistance to scratches and stains. A thicker wear layer is ideal for high-traffic areas, ensuring the installation maintains its integrity and appearance over time.
- Underlayment Compatibility: The compatibility of the laminate with underlayment materials can affect sound absorption and comfort. Using the right underlayment enhances the installation by providing cushioning and helping to level out minor imperfections in the subfloor.
What Essential Tools Are Needed for Perfect Laminate Installation?
For the best laminate installation, several essential tools are necessary to ensure a professional finish.
- Measuring Tape: A measuring tape is crucial for accurately measuring the space where the laminate will be installed. It helps to determine the amount of material needed and ensures that every piece fits perfectly within the designated area.
- Laminate Flooring Cutter: A laminate flooring cutter allows for precise cuts to fit the laminate pieces around corners and edges. This tool can be a specialized laminate cutter or a simple miter saw, providing clean cuts that maintain the integrity of the laminate.
- Spacers: Spacers are used to maintain a consistent gap between the laminate flooring and the walls or other fixed objects. This gap is essential for allowing for expansion and contraction due to temperature and humidity changes, preventing buckling or warping.
- Rubber Mallet: A rubber mallet is useful for tapping the laminate planks into place without damaging the surface. This tool ensures that the planks fit snugly together while avoiding any dents or scratches that could occur with a harder mallet.
- Pull Bar: A pull bar is handy for locking planks together in tight spaces where a tapping block cannot be used. It helps to pull the planks snugly against each other while protecting the edges from damage during installation.
- Utility Knife: A utility knife is essential for making quick and clean cuts on laminate planks, especially for trimming edges or cutting around obstacles. It is versatile and can be used for other tasks, such as removing excess material or adjusting planks as needed.
- Level: A level ensures that the subfloor is even before installation begins. An uneven subfloor can lead to problems in the laminate installation, including gaps and instability, which can affect the overall appearance and durability of the floor.
- Safety Gear: Safety gear, including goggles and gloves, should not be overlooked during installation. These items protect against potential injuries from sharp tools and materials, ensuring a safer working environment.
What Steps Should Be Taken to Prepare for Laminate Installation?
To ensure the best laminate installation, several key steps should be meticulously followed.
- Choose the Right Laminate: Selecting the appropriate laminate is crucial for both aesthetics and functionality. Consider factors such as thickness, wear layer, and style that complement your space and meet your durability needs.
- Prepare the Subfloor: A clean, dry, and level subfloor is essential for a successful installation. Remove any old flooring, repair any imperfections, and make sure the surface is free from debris to prevent issues post-installation.
- Acclimate the Laminate: Allow the laminate planks to acclimate to the room’s temperature and humidity for at least 48 hours. This step helps to prevent expansion or contraction after installation, ensuring a tight fit and reducing the risk of gaps.
- Gather Necessary Tools: Having the right tools on hand makes the installation process smoother. Essential tools include a saw, measuring tape, spacers, a hammer, and a tapping block, which will aid in achieving precise cuts and a secure fit.
- Plan the Layout: Before installation, determine the best layout for the laminate planks. Consider the direction of light and the room’s shape to create a visually pleasing pattern while ensuring planks are laid in a staggered formation to enhance stability.
- Install Underlayment: Installing an underlayment helps with sound absorption and provides moisture protection. Choose an underlayment that suits your specific laminate flooring requirements and the conditions of your subfloor for optimal performance.
- Follow Installation Instructions: Adhering to the manufacturer’s installation guidelines is vital for warranty purposes and achieving the best results. Each laminate product may have specific requirements, so review the instructions carefully before proceeding.
- Leave Expansion Gaps: It’s important to leave expansion gaps around the perimeter of the room and any fixed objects. This allows the laminate to expand and contract with changes in temperature and humidity, preventing warping or buckling.
- Clean Up After Installation: Once installation is complete, remove any debris and dust from the floor. This step not only enhances the final look but also helps in maintaining the laminate, as dirt can scratch and damage the surface over time.
What Are the Key Steps to Achieve a Flawless Laminate Installation?
The key steps to achieve a flawless laminate installation include proper preparation, acclimation of materials, precise cutting, and ensuring a level surface.
- Preparation of the Subfloor: This step involves cleaning and repairing the subfloor to ensure it is free from debris, moisture, and imperfections. A clean, level, and dry surface is crucial as it helps to prevent issues like warping and gaps in the laminate over time.
- Acclimation of Laminate Planks: Before installation, laminate planks should be acclimated to the room’s temperature and humidity for at least 48 hours. This process allows the planks to adjust to the environment, reducing the risk of expansion or contraction after they are installed.
- Using Underlayment: Installing an appropriate underlayment is essential as it provides cushioning, sound absorption, and moisture protection. This layer helps to enhance the feel underfoot and can also improve the overall performance of the laminate flooring.
- Precise Cutting of Planks: Accurate measurement and cutting of laminate planks are critical for a seamless fit. Use a fine-toothed saw for clean cuts and ensure that you leave an expansion gap around the perimeter of the room to accommodate any movement of the flooring.
- Proper Installation Method: Depending on the laminate type, follow the manufacturer’s recommended installation method, whether it’s a click-lock system or glue down. Pay attention to the pattern and direction of the planks, as staggering the seams can enhance the aesthetic appeal and structural integrity.
- Final Touches: After installation, check for any gaps or misalignments that need to be corrected. Installing baseboards or quarter rounds can provide a finished look while covering expansion gaps, ensuring the flooring looks polished and professional.
What Common Pitfalls Should Be Avoided in Laminate Installation?
When it comes to the best laminate installation, there are several common pitfalls to avoid for a successful project.
- Skipping the Acclimation Process: Failing to allow laminate planks to acclimate to the room’s temperature and humidity can lead to expansion or contraction after installation. This step is crucial because it helps the material adjust to its environment, minimizing the risk of warping or gaps.
- Not Using a Proper Underlayment: Installation without the right underlayment can result in moisture damage and noise issues. The underlayment provides cushioning, sound absorption, and moisture barrier functions, ensuring that the laminate flooring performs well over time.
- Improperly Measuring the Space: Inaccurate measurements can lead to wasted materials and a poor fit. Always double-check dimensions and plan for cuts and waste to ensure that the laminate fits snugly and looks professional.
- Ignoring Expansion Gaps: Neglecting to leave appropriate expansion gaps around the perimeter can cause the laminate to buckle due to temperature fluctuations. These gaps are essential for allowing the flooring to expand and contract naturally without damaging the planks or the subfloor.
- Using the Wrong Tools: Employing inappropriate tools can result in uneven cuts and poor installation quality. Always use laminate-specific tools such as a tapping block, pull bar, and laminate cutter to achieve clean cuts and a secure fit.
- Inadequate Cleaning of the Subfloor: Installing laminate over a dirty or uneven subfloor can lead to problems such as squeaking or premature wear. Ensure the subfloor is thoroughly cleaned and leveled to provide a stable base for the laminate flooring.
- Not Following Manufacturer Instructions: Different laminate products may have specific installation guidelines that must be followed. Ignoring these instructions can void warranties and lead to installation failures, so it’s important to read and adhere to the manufacturer’s recommendations.
How Can You Maintain Laminate Flooring for Longevity?
To maintain laminate flooring for longevity, several key practices should be followed:
- Regular Cleaning: Frequent sweeping or vacuuming helps remove dirt and debris that can scratch the surface. It’s important to use a damp mop with a laminate-friendly cleaner instead of excessive water, which can damage the flooring.
- Protective Measures: Using felt pads under furniture legs can prevent scratches and dents on the laminate surface. Additionally, area rugs in high-traffic zones can help reduce wear and tear.
- Control Humidity Levels: Laminate flooring can expand or contract with changes in humidity, so it’s crucial to maintain a stable environment. Using a dehumidifier in humid climates or a humidifier in dry climates can help protect the integrity of the flooring.
- Avoid Excessive Water: Standing water can cause laminate to warp or swell, so spills should be cleaned up immediately. When mopping, ensure the mop is only slightly damp to avoid moisture seeping into the seams.
- Use Appropriate Cleaning Products: Products that are specifically designed for laminate flooring should be used to avoid damage. Harsh chemicals or abrasive tools can scratch or dull the surface finish of the laminate.
- Routine Inspections: Regularly checking for signs of damage, such as wear or loose planks, can help catch issues early. Addressing problems promptly can prevent more extensive repairs or replacements later.
- Proper Installation: Ensuring that the laminate is installed correctly is vital for its longevity. This includes allowing for expansion gaps and following manufacturer guidelines during installation.