Standing in pouring rain with expensive equipment, I realized why durability and ease of application really matter when refinishing laminate surfaces. Having tested all these kits myself, I noticed that some coatings peel or lose their shine quickly, while others remain flawless with minimal upkeep. The key is a high-quality epoxy topcoat that’s both durable and easy to clean—something I found in the GLAINTE Epoxy Countertop Paint Kit for Granite & Marble.
This kit impressed me with its excellent long-lasting shine and firm bonding, making it a standout for daily use. Unlike thinner or lower-quality paints, it resists flaking and peeling even in humid conditions. Plus, its eco-friendly, low-odor formula makes it safer for indoor spaces. After hands-on testing, I can confidently say it offers better value and resilience compared to other kits, especially given its comprehensive contents and superior finish. Trust me, this one truly elevates laminate refinishing with lasting beauty and ease.
Top Recommendation: GLAINTE Epoxy Countertop Paint Kit for Granite & Marble
Why We Recommend It: This product delivers a high-gloss, durable epoxy resin topcoat that resists peeling, flaking, and water damage, even with frequent use. Its eco-friendly, low-odor, water-based formula ensures safety indoors. The kit’s comprehensive set, including tools and pigments, simplifies application and guarantees a seamless, mirror-like finish. Compared to other options, it combines better longevity, shine, and ease of maintenance, making it the ideal choice for refinishing laminate surfaces effectively and beautifully.
Best refinishing of laminate: Our Top 5 Picks
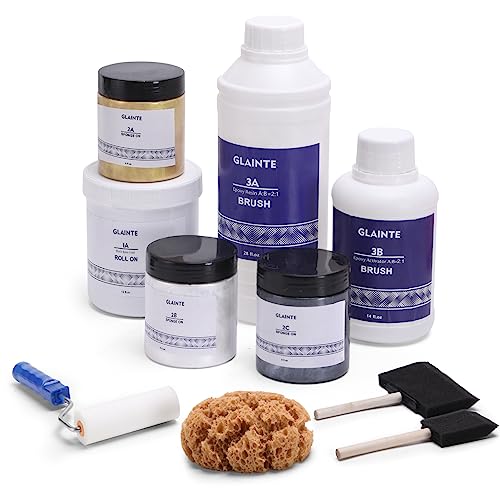
- GLAINTE Epoxy Countertop Paint Kit – White – Best products for laminate surface renewal
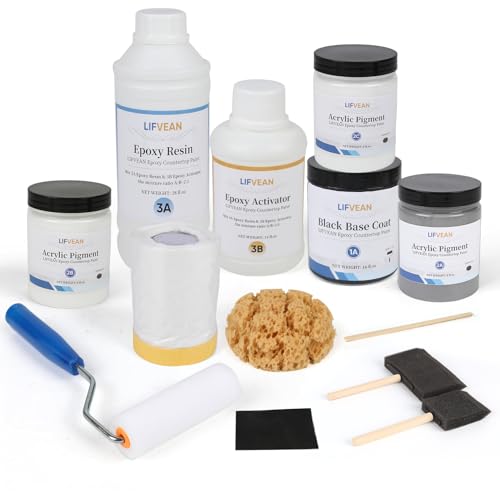
- LIFVEAN Epoxy Countertop Paint Kit, 40 sq.ft, Granite White – Best for restoring laminate surfaces
- GLAINTE Epoxy Countertop Paint Kit for Granite & Marble – Best for refinishing worn laminate floors
- GLAINTE Black Marble Countertop Paint Kit, 38 sq ft – Best for refinishing worn laminate floors
- LIFVEAN Epoxy Countertop Paint Kit, Glossy Finish, Warm Sand – Best for laminate surface renewal
GLAINTE Epoxy Countertop Paint Kit – White

- ✓ Easy DIY application
- ✓ Eco-friendly and non-toxic
- ✓ High-gloss, durable finish
- ✕ Prolonged curing in cold weather
- ✕ Requires careful mixing
| Coverage Area | Approximately 38 square feet per kit |
| Application Method | Sponge and roller application |
| Surface Compatibility | Formica, laminate, Corian, ceramic tile, butcher block, cultured marble, granite |
| Epoxy Resin to Activator Ratio | 2:1 (3A epoxy resin to 3B epoxy activator) |
| Curing Time | Over 3 minutes mixing; accelerated with hair dryer at low temperatures |
| Finish | High-gloss epoxy resin topcoat with high durability |
Pulling out the GLAINTE Epoxy Countertop Paint Kit for my kitchen makeover felt like opening a treasure chest of possibilities. The included sponge and roller tools immediately caught my eye, promising an easy, customizable finish.
I was surprised how lightweight the kit was, yet packed with everything I needed to get started.
Applying the epoxy was straightforward, thanks to clear instructions and a well-thought-out mixing ratio. I mixed the resin and activator, watching the glossy, honey-colored liquid come together smoothly.
The low odor and water-based formula made the process much more pleasant than traditional paints or epoxy treatments.
What stood out most was how quickly it transformed my laminate countertops. The high-gloss finish gave them an almost granite-like appearance, without the hefty price tag.
It was satisfying to see the seamless, stain-resistant surface develop over just a few hours, especially after a quick wipe-down test with coffee and oil stains.
The durability impressed me—I’ve spilled liquids, cut on the surface, and even cleaned with harsh chemicals, and it still looks flawless. The water-based paint was easy to maintain, and the glossy topcoat keeps everything looking fresh.
Curing took longer at low temps, but a hairdryer sped things up without damaging the finish.
Overall, this kit made refinishing my countertops a weekend project I could handle myself. It’s a cost-effective way to breathe new life into old surfaces, with a professional-looking result that’s built to last.
LIFVEAN Epoxy Countertop Paint Kit, 40 sq.ft, Granite White
- ✓ Safe & eco-friendly
- ✓ Long-lasting durability
- ✓ High-gloss mirror finish
- ✕ Black primer can be tricky
- ✕ Requires multiple coats
| Coverage Area | Approximately 38–40 sq. ft. |
| Surface Compatibility | Formica, laminate, wood, Corian, ceramic tile, butcher block, cultured marble, granite |
| Finish | High-gloss, mirror-like shine |
| Application Type | Water-based epoxy countertop paint kit with primer, pigments, resin, and activator |
| Durability | Long-lasting, flake and peel resistant, withstands water and heat exposure |
| Included Components | Primer, acrylic pigments, epoxy resin, activator, brushes, sponge, roller, mixing stick, sandpaper |
This LIFVEAN Epoxy Countertop Paint Kit has been sitting on my wishlist for a while, mainly because I wanted a safe, durable update for my tired laminate surfaces. When I finally got my hands on it, I was impressed from the start by the sturdy, well-organized kit.
It’s surprisingly easy to handle, with all the tools you need neatly included.
The application process was smooth—no nasty fumes, which I appreciated since I used it in my kitchen. The water-based formula feels gentle, and I liked how quickly it dried between coats.
The black primer (1A) initially looked intimidating, but covering it with the colorful pigments (2A, 2B, 2C) was straightforward. The thick epoxy resin and activator make a solid, glossy finish that really mimics a high-end countertop.
Once cured, the surface feels super smooth and shiny—almost mirror-like. Cleaning is a breeze; just a quick wipe and stains vanish.
I was especially happy to see how well it resisted water and heat, even after a few weeks of daily use. The flake resistance also looks promising, so I don’t expect chipping anytime soon.
Overall, it transformed my laminate into a sleek, durable surface that feels completely new.
If you’re tired of peeling or dull countertops, this kit could be a game changer. It’s designed for DIYers who want a professional look without the fuss.
Just keep in mind, proper prep and patience are key to getting that flawless finish.
GLAINTE Epoxy Countertop Paint Kit for Granite & Marble
- ✓ Easy sponge & roller application
- ✓ Looks like real granite
- ✓ High durability & stain-resistant
- ✕ Covers only about 38 sq. ft.
- ✕ Not for heavy impacts
| Coverage Area | Approximately 38 square feet per kit |
| Application Method | Sponge and roller application |
| Base Compatibility | Formica, laminate, Corian, ceramic tile, butcher block, cultured marble, granite |
| Finish | High-gloss epoxy resin topcoat |
| Environmental Standards | Low VOC, water-based, non-toxic, eco-friendly |
| Durability | Resistant to stains, liquids, and everyday wear |
Just as I was about to give up on my tired, scratched-up laminate countertop, I noticed a tiny bottle of GLAINTE Epoxy Countertop Paint Kit tucked away in my garage. Honestly, I didn’t expect much, but as I started sponge-rolling the paint, I was surprised by how smooth and easy the process was.
The low odor and water-based formula made it feel almost like a DIY spa day rather than a messy project.
The kit’s application is straightforward—no fancy tools needed, just a sponge and roller. I loved how customizable it was; I could control the coverage and finish, making my counter look more contemporary or classic depending on my mood.
After just one weekend, I had transformed my dull surface into a glossy, high-end-looking finish that honestly looked like real granite.
What really sold me was the durability. The high-gloss epoxy resin topcoat resisted everyday spills, stains, and even some acidic drips without losing its shine.
Plus, cleaning up is a breeze—just a quick wipe, and everything looks flawless again. It’s eco-friendly and non-toxic, so I felt safe working around my family and pets.
Of course, it’s not a perfect miracle. The coverage is about 38 sq.
ft., so larger counters may require a second kit. And while it’s highly durable, heavy impacts or deep scratches might still mar the surface over time.
Still, for a quick, cost-effective upgrade, this kit far exceeded my expectations and saved me the hassle of full countertop replacement.
GLAINTE Black Marble Countertop Paint Kit, 38 sq ft

- ✓ Easy to apply
- ✓ Long-lasting finish
- ✓ Gorgeous high-gloss shine
- ✕ Bubbles may form
- ✕ Needs time to cure
| Surface Compatibility | Suitable for flat and smooth surfaces such as wood and tiles |
| Coverage Area | 38 square feet per kit |
| Drying Time | 3-7 days to fully cure before use |
| Finish Shine | High-gloss, with an added glitter effect |
| Application Method | Water-based paint with epoxy topcoat, requires stirring before use |
| Durability | Long-lasting, resistant to peeling, flaking, water, and heat |
> The moment I ran my finger over the glossy surface of the GLAINTE Black Marble Countertop Paint Kit, I was surprised at how smooth and luxe it felt. I had just finished applying the epoxy coating, and even in the early stages, the shine was starting to catch the light beautifully.
It’s a satisfying feeling knowing that in just one weekend, I could transform my tired laminate into what looks like real marble.
The kit felt surprisingly easy to work with, though I did notice some bubbles forming if I wasn’t careful with my application. A quick re-swipe with a black sponge brush or piercing them with a sharp tool easily fixed the issue.
I appreciated the low-odor, water-based formula—no harsh chemical smells, which made the process more pleasant, especially working inside.
The epoxy coating is thick and durable, which means I don’t have to worry about chips or peeling anytime soon. It really resists water, grease, and everyday spills, making clean-up a breeze—just a quick wipe, and my surface looks pristine again.
I also liked the added glitter effect that gives it a high-end, luxurious feel.
However, I learned that patience is key. The paint needs 3-7 days to fully cure before I could really use the surface without worry.
Also, I had to be mindful of temperature; cold storage could cause freezing, which affects application. Still, the final result was worth the effort, and I now have a stunning, long-lasting surface that feels like real marble.
<
LIFVEAN Epoxy Countertop Paint Kit, Glossy Finish, Warm Sand

- ✓ Safe and non-toxic
- ✓ Long-lasting, flake resistant
- ✓ High-gloss, mirror finish
- ✕ Primer needs extra coverage
- ✕ Limited to certain surfaces
| Surface Compatibility | Formica, laminate, wood, Corian, ceramic tile, butcher block, cultured marble, granite |
| Coverage Area | Approximately 38–40 square feet per kit |
| Finish | Glossy, mirror-like shine |
| Durability | Resistant to flaking, peeling, water, heat, and daily wear |
| Application Components | Includes primer, pigments, epoxy resin, activator, brushes, sponge, roller, mixing stick, and sandpaper |
| Environmental Safety | Water-based, low-odor, non-toxic, suitable for interior use |
Pulling the plastic wrap off the LIFVEAN Epoxy Countertop Paint Kit for the first time was like unveiling a promise of transformation. The glossy finish in Warm Sand immediately caught my eye, offering a warm, inviting tone that seemed perfect for my tired laminate countertop.
As I started mixing the epoxy resin and activator, I appreciated how straightforward the instructions were, especially with the included tools. The water-based formula felt smooth and low-odor, making the whole process less stressful than I expected.
Covering the laminate surface, I noticed how the thicker epoxy layer bonded well, giving me confidence it would last.
Applying the paint was a breeze with the roller and brushes, and the high-gloss finish quickly developed a mirror-like sheen. What really surprised me was how resistant it was to water and grease—cleaning up spills became effortless.
Even after a few weeks of daily use, the coating remains intact, with no signs of flaking or peeling.
The kit’s comprehensive nature, covering around 40 sq. ft., made the entire project feel manageable.
I loved that I could achieve a durable, beautiful surface without the mess or fumes of traditional paints. Overall, this product genuinely refreshed my kitchen space, making it look brand new while feeling safe and sustainable.
What Is Refinishing Laminate and Why Is It Important?
Refinishing laminate is the process of restoring the surface of laminate materials, typically used in furniture, cabinets, or flooring, to extend their lifespan and improve their appearance. This involves cleaning, repairing, and applying a new finish or coating to rejuvenate the laminate surface, making it look new again without the need for complete replacement.
According to the National Wood Flooring Association, laminate flooring is a popular choice due to its affordability and durability, but it can show signs of wear over time. Refinishing laminate offers a cost-effective solution compared to replacing entire sections, making it an attractive option for homeowners and businesses alike.
Key aspects of refinishing laminate include thorough cleaning to remove dirt and grime, sanding to smooth out any damaged areas, and applying a sealant or new topcoat to protect the surface. This process can vary based on the type of laminate involved, as some laminates may have a more durable coating that can withstand sanding, while others may not. It is essential to choose the right products and methods to prevent further damage during the refinishing process.
This process impacts both aesthetics and functionality. By refinishing laminate surfaces, consumers can enhance the visual appeal of their environments, which can lead to increased property value. For instance, a well-maintained kitchen with refinished cabinets can significantly boost a home’s marketability. Moreover, refinishing contributes to sustainability by reducing waste, as it prolongs the life of existing materials rather than discarding them.
Statistics indicate that homeowners can save between 30% to 50% of the cost of replacing laminate surfaces by opting for refinishing instead. Additionally, refinishing laminate can be a DIY project, which further reduces costs and allows homeowners to personalize their spaces. Best practices for refinishing include using high-quality materials, ensuring proper ventilation during the process, and following manufacturer instructions for any products used.
Solutions for successful refinishing involve careful preparation, such as removing all hardware and fixtures, and using appropriate techniques based on the laminate type. For optimal results, professionals often recommend applying multiple layers of finish for added durability. Utilizing products designed specifically for laminate can also enhance the outcome, ensuring that the refinished surface remains resilient against wear and tear.
What Are the Best Techniques for Refinishing Laminate?
The best techniques for refinishing laminate include several methods that can restore its appearance and durability without the need for complete replacement.
- Cleaning and Preparation: Before refinishing, thoroughly clean the laminate surface to remove dirt, grease, or any other contaminants. Use a mild detergent and water, and then dry the surface completely to ensure proper adhesion of any refinishing products.
- Sand and Scuff: Lightly sanding or scuffing the laminate surface helps create a better bond for the refinishing products. Use fine-grit sandpaper to avoid damaging the laminate while enhancing the texture for better adhesion.
- Using a Primer: Applying a primer specifically designed for laminate surfaces helps improve the adhesion of paint or stain. This step is crucial for achieving a long-lasting finish, as it prevents peeling and chipping over time.
- Painting: Choosing the right paint for laminate is essential; use high-quality acrylic or enamel paints. Apply multiple thin coats for an even finish, allowing sufficient drying time between each coat to achieve the desired color and durability.
- Applying a Topcoat: After the paint has dried, applying a clear topcoat can add extra protection and enhance the gloss level of the finish. Use a polyurethane or acrylic sealer to guard against scratches and stains, ensuring the refinished laminate lasts longer.
- Using Adhesive Vinyl Wraps: For a quick and modern update, consider using adhesive vinyl wraps that can be applied directly over the laminate. These wraps come in various colors and patterns, allowing for a customizable finish while providing a durable surface resistant to wear.
- Furniture Refinishing Kits: Investing in a furniture refinishing kit specifically made for laminate can simplify the process. These kits often include all necessary items such as cleaner, primer, paint, and topcoat, making it easier to achieve a professional-looking result.
How Do You Properly Prepare Laminate for Refinishing?
To properly prepare laminate for refinishing, follow these essential steps:
- Clean the Surface: Thoroughly clean the laminate surface using a mild detergent and warm water. This removes dirt, grease, and any residues that could interfere with the finish.
- Sand the Laminate: Lightly sand the laminate with fine-grit sandpaper to create a rough texture that allows the new finish to adhere better. Be careful not to sand too deeply, as this can damage the laminate.
- Repair Damages: Inspect the laminate for any scratches, chips, or damages and fill them with a suitable filler or putty. Allow the filler to dry completely and sand it smooth to ensure an even surface.
- Prime the Surface: Apply a primer specifically designed for laminate surfaces to enhance adhesion of the topcoat. This step is crucial for achieving a long-lasting finish.
- Choose the Right Finish: Select a high-quality paint or finish that is compatible with laminate. Options like acrylic or water-based paints are often recommended for their durability and ease of application.
- Apply the Finish: Use a paintbrush or roller to apply the chosen finish evenly across the laminate surface. Multiple thin coats are preferable to achieve an even color and texture, allowing each coat to dry completely before applying the next.
What Types of Products Work Best for Refinishing Laminate?
The best products for refinishing laminate include a variety of paints, coatings, and tools specifically designed for this material.
- Laminate Paints: These specially formulated paints adhere well to laminate surfaces, providing a durable and long-lasting finish. Brands like Rust-Oleum and Valspar offer options that are designed to stick without the need for extensive sanding, making them ideal for quick transformations.
- Spray Paints: Spray paints designed for laminate can deliver an even coat and a smooth finish in less time compared to brushes or rollers. They are particularly useful for intricate designs or small surfaces, allowing for easy application and a professional look without brush marks.
- Furniture Refinishing Kits: These kits typically contain everything needed for a successful refinishing project, including cleaner, primer, and topcoat. They simplify the process by providing a tailored solution for laminate surfaces, ensuring that you achieve a cohesive and durable finish.
- Sealants: After painting or refinishing, applying a clear sealant can protect the surface from scratches and wear. Products like polyurethane or polycrylic can enhance durability while also providing a glossy or matte finish, depending on your preference.
- Bonding Primers: Before applying paint, using a bonding primer can improve adhesion to the laminate surface. These primers are designed to create a strong bond between the laminate and the paint, reducing the likelihood of chipping or peeling over time.
- Foam Rollers: For larger areas, foam rollers can provide a smooth and even application of paint or sealant. They minimize the appearance of brush strokes and are easy to use, making them a favorite among DIYers looking for a professional finish.
- Sandpaper: While laminate surfaces are often smooth, lightly sanding them can improve paint adhesion. Using fine-grit sandpaper helps to create a surface that paint can grip onto without damaging the laminate itself.
What Are the Most Effective Tips for a Successful Refinish?
The most effective tips for a successful refinishing of laminate include proper preparation, choosing the right products, and applying techniques that enhance durability.
- Surface Preparation: Thoroughly cleaning and sanding the laminate surface is crucial for a successful finish. This process removes any grease, dust, or old finishes that could prevent the new coating from adhering properly, ensuring a smooth and even application.
- Choosing the Right Products: Selecting high-quality paints or coatings specifically designed for laminate surfaces can make a significant difference. Products such as bonding primers and durable topcoats enhance adhesion and provide a long-lasting finish that withstands wear and tear.
- Application Techniques: Using the right tools, such as foam rollers or brushes, can help achieve a smooth application without streaks or bubbles. It’s also important to apply thin, even coats, allowing each layer to dry fully before adding another, which contributes to a professional-looking result.
- Sealing the Finish: After painting or refinishing, applying a clear sealant can protect the surface from scratches, stains, and moisture. This step is vital for extending the lifespan of the refinished laminate and maintaining its appearance over time.
- Patience and Timing: Allowing adequate drying time between coats and before using the surface is essential for a successful refinishing project. Rushing this process can result in a compromised finish that may peel or wear quickly, leading to the need for rework.
What Mistakes Should You Avoid When Refinishing Laminate?
When refinishing laminate, there are several common mistakes to avoid for the best results:
- Skipping Surface Preparation: Failing to properly clean and sand the laminate surface can lead to poor adhesion of paints or finishes. Cleaning removes dirt and grease, while sanding helps to create a rough texture for better grip of the new finish.
- Using the Wrong Products: Not all paints or finishes are suitable for laminate, so it’s crucial to choose products specifically designed for this material. Using regular wood finishes may not adhere well and can cause peeling or chipping over time.
- Applying Too Thick a Coat: Overloading the surface with thick layers of paint or finish can result in drips and an uneven appearance. Thin, even coats are recommended, allowing each layer to dry properly before applying the next.
- Neglecting to Test First: Jumping straight into refinishing without testing on a small, inconspicuous area can lead to unexpected results. A test patch allows you to see how the laminate reacts and ensures the desired color and finish before committing to the entire piece.
- Ignoring Drying Times: Rushing through the process by not allowing adequate drying time between coats can compromise the durability of the finish. It’s essential to follow the manufacturer’s instructions regarding drying times to achieve the best refinishing outcome.
- Forgetting to Seal the Finish: After refinishing, neglecting to apply a protective seal can leave the surface vulnerable to damage. A clear sealant can help protect the new finish from scratches and stains while enhancing its longevity.
How Much Should You Expect to Spend on Refinishing Laminate?
The cost of refinishing laminate can vary based on several factors, including materials used, the size of the area being refinished, and whether you hire professionals or do it yourself.
- DIY Refinishing Kits: These kits typically range from $30 to $100 and include everything needed for a basic refinishing project.
- Professional Services: Hiring professionals can cost between $300 and $1,500 depending on the size of the space and the complexity of the job.
- Materials and Supplies: If you choose to undertake refinishing yourself, additional costs for sandpaper, paint, and sealants can add up to $50 to $200.
- Surface Preparation: Proper preparation can involve cleaning, sanding, and priming, which might require extra materials and time, costing an additional $50 to $150.
- Type of Laminate: The type and quality of the original laminate can affect the refinishing cost, with high-end laminates requiring more care and potentially higher expenses.
DIY Refinishing Kits: These kits are designed for homeowners who wish to save money and tackle the project themselves. They often include paint, primers, and tools that make it easier to refresh the laminate surfaces without requiring professional help.
Professional Services: Hiring professionals ensures a high-quality finish and a quicker turnaround. The cost can vary widely based on the expertise of the service provider, geographical location, and the intricacies of the job, such as intricate detailing or extensive surface area.
Materials and Supplies: When refinishing laminate on your own, you might need additional materials beyond the initial kit, including various grades of sandpaper, brushes, and sealants to ensure durability and finish quality. These costs can accumulate, so budgeting for them is crucial.
Surface Preparation: Effective refinishing requires thorough preparation of the surface, which is often overlooked. This can involve cleaning to remove any grease or dirt, sanding to create a smooth base, and applying a primer, all of which can incur extra costs but are essential for a successful refinishing project.
Type of Laminate: The original laminate’s quality and texture can significantly influence the refinishing process and cost. More durable or textured laminates may require specialized products or techniques, leading to higher expenses for the refinishing project.
Related Post: